# What is ProdCamp?
And what is it a good fit for?
#### 👋
#### ProdCamp is a user feedback and product management platform.
We've built this system because we had faced the same challenges in our previous experiences. It has been always a challenge to keep getting customer feedback, consistently store it in a consumable way, and also make it actionable, not to collect for the sake of collecting.
* **Feedback Management**
ProdCamp can help you to collect customer feedback from multiple channels and store it in a single repository. One for each of your products.
You can collect feedback using various channels, all of which are listed [here](/feedback-channels/customer-feedback).
Once collected, the feedback should be actionable. And this is where our Product Management piece comes into play.
* **Product Management**
It's crucial to listen to your customers to understand what needs to be built. At the end of the day, it's up to them whether or not they will keep paying for your service or churn away.
When you have feedback in our system, act on it.
First and foremost, read it attentively.
Then, connect it to a feature or several, if that's the case.
Prioritize features based on customers' value for a feature taken from Salesforce.
After it's prioritized, push the features that you want to ship to Jira.
* **Feedback Management (continued)**
Finally, close the feedback loop by following up with the customer, and thanking them for their feedback.
# How it works
## Types of entities in ProdCamp
1. Features\
Features are improvements of your product or a service that you added to your ProdCamp account. In other products, it could be called an idea or a working item.\
Features are typically created by a product owner or a product manager but lately, we see a trend of customer support, sales, and customer success teams are also taking part in this.
2. Feedback\
In ProdCamp everything a customer does is feedback, whether or not they send you an email, suggest a new feature, or upvote an existing feature on the public roadmap. What we call feedback is some other tools is called an idea (like with features, confusing, right?) or an insight. We think that not every customer feedback contains an insight or an idea. Oftentimes, feedback contains details on multiple areas of improvements brought up by a customer (and it can be attached to multiple features).\
\
What types of feedback exist in ProdCamp?\
\- upvote (or like on a public roadmap)\
\- feature suggestion\
\- Intercom message\
\- email\
\- customer quote (captured with a Chrome extention)\
\- customer interview\
an more to come\
3. Comments\
Comments exist for both: features and feedback. They're used to enrich the context of the content.\
\
On the public roadmap, visitors can leave comments or upvote features while providing details. And it's not the same thing. A comment is not an upvote and it doesn't affect the upvote counter.\
Comments to a feature are visible by default but could be hidden by an administrator.\
Details to a feature suggestion or an upvote are never public.
## Public Roadmap Visitor flow
* As a public roadmap visitor, I can upvote a feature. \
The only visible change is the +1 on the feature likes counter.
* As a public roadmap visitor, I can upvote a feature and supply it with additional context by adding details.\
This information is not shared publicly and sent to the vendor's account. The only visible change will be the +1 on the feature likes counter.
* As a public roadmap visitor, I can leave a comment on a feature. This information is public and can be seen by everyone. In some cases, it can be hidden by an administrator.
## Public Roadmap Administrator flow
* As a company employee, I can reply to a comment on the public roadmap or in the ProdCamp app inside the feature in question. When replying from inside the app, my name will be highlighted as a company employee.
* As a company employee, I can hide a comment if it's irrelevant or spam.
## FAQ
1. Can customers create features on their own?\
No. At least not at this point.
2. Is an upvote technically feedback?\
An upvote is feedback. It can come with a comment or without one.
3. When submitting a feature proposal, does it create a feature?\
No, it's a feedback.
4. When I leave feedback details to an upvote, will it create a feature?\
No, it's still feedback.
# Getting Started with ProdCamp
Introduction to ProdCamp and feedback management will help you get started.
To get started with ProdCamp, you can either ask for a personal live demo (just send us an email to [hello@prodcamp.com](mailto:hello@prodcamp.com?subject=Onboarding%20request)) or you can watch our onboarding tour and perform steps on your own.
1. Go to [Product settings](https://app.prodcamp.com/products), edit the name of your product, and customize settings as you see fit. Refer to [this page](/products/create-a-product) for help.
2. Add your [**custom domain**](/getting-started/custom-domain).
3. [Import features](/operations/import-features) for your product to be able to start connecting customer feedback or/and to share them.
4. If you're just starting, then you'll gain customers as you move along. If you already have customers, you can [import](/operations/import-customers) them or [integrate with Salesforce](/integrations/salesforce) and they will be fetched automatically.
5. Well done, you have customized your product settings, you have imported features as well as you have customers in the system. Now, it's time to add feedback channels. Here you can find some links on how to start collecting feedback:\
\- [Email Forward](/feedback-channels/email-forwarding)\
\- [Public roadmap](/roadmaps/public-roadmap)\
\- [Google Chrome Extension](/feedback-channels/google-chrome-extension)\
\- [Intercom Messenger](/integrations/intercom)\
\- [In-app widget](/widgets/feedback-widget) (embeddable feedback form)\
\- [NPS widget](/widgets/nps-widget) (embeddable NPS survey)\
\- [API](/api/auth)
6. It's time to add [Slack integration](/integrations/slack) to get notifications on upvotes on the public roadmap.
7. And last, but not least, [invite your colleagues](/getting-started/invite-your-team) to collaborate.
Well done! 🙌
After you do all these steps, don't forget to check out our [prioritization](/prioritization/matrix) and [Jira integration](/integrations/jira) to pass the ball to your RnD.
# Invite Your Team
How to add your colleagues to ProdCamp
To collaborate more effectively you should take these 4 steps:
1. Click on the gear button in the top right corner to go to the **Settings** page.
2. Click on the "**Add new user**" button.
3. Type your colleague's email in the pop-up.
4. Click the "**Send invite**" button.

# Custom Domain
It's best to keep the apps and services you use to provide your service on your own domain, it makes your business look more credible.
With ProdCamp it's very easy to create a public roadmap or a feature voting portal on your own domain.
When you create a product, you will get an automatically generated URL where your portal will be available.

If you don't have your domain (who said that every business should have a website and thus a domain?) you can use our subdomain, like **yourapp.prodcamp.com**.
If you have your own domain, then you need to do the following:
1. **Select the domain** for your feature voting portal or a public roadmap. Usually, it's a sub-domain and it looks something like this: roadmap.yourdomain.com
2. **Configure** a **CNAME** record for the domain (or a sub-domain) that you will use for your public roadmap (changelog or a voting portal) in your DNS provider to point it to **cname.prodcamp.com**
3. **Click "Check" to make sure that your CNAME record was configured correctly. Please note that depending on the record's setting on the expiration period, it might take some time to update it.**
4. The toggle for the custom domain is used to enable/disable public access to the portal.
# Attaching Feedback to a Feature
Clients are leaving tones of feedback, so it's critical to keep up with the flow and have a clear and easy process to organize and leverage them.
1. Head over to the right product and go to the Customer Feedback section on the main menu.

2\. Select the feedback that you would like to process. If it wasn't changed yet, it will have a New status.

3\. In the interface that shows up, you can read the content of the feedback and the reporter. Under the feedback content field, you will find "Linked Features".

4\. Click on either the "Link feature", or "Create new".
5\. In the "Search features", type the name of the feature that you want to connect the feedback to.

6\. Click OK and then click the cross to close the pop-up.
7\. You're all set. ✅
# Processing Feedback
Processing feedback is crucial to getting context from your users. Read carefully and link to the right product improvements.
While processing customer feedback you can attach it to a single or multiple features, or [create a new one](/features/create-a-feature).


Select the feature you need from the list, change the "**State**" to **Processed** and it's done.
{% hint style="info" %}
Notice: when you set the "**State**" field to **Processed** - a customer that has provided the feedback will receive an email stating that the feedback was processed. But such an email will be sent ONLY if this feedback came from a [public roadmap](/roadmaps/public-roadmap) (upvote or feature proposal) or the [embeddable widget](/widgets/feedback-widget).
Learn more [here](/feedback-loop/closing-feedback-loop).
{% endhint %}
# Customer Feedback Channels
Below is the list of essential channels that will help you to collect more context from your customers.
Here's the list of supported feedback channels:
**1.** [**The ProdCamp app**](https://app.prodcamp.com/?ref=help)
One of the most used channels is when you type something manually. Whether or not, it's a customer interview, a copy-paste from your notes, or spreadsheets.
**2.** [**Public Roadmap**](/roadmaps/public-roadmap)
It's great to be transparent with your audience and let them see what is up next. We enable companies to set up a public roadmap page for each project inside your ProdCamp workspace. Check our own public roadmap page [here](< https://roadmap.prodcamp.com>).
**3.** [**Feature voting portal**](/roadmaps/public-roadmap)
Let your customers help you. Create a feature voting portal and collect upvotes on concrete features to understand what is it that your customers expect from you.
**4.** [**Email forwarding**](/feedback-channels/email-forwarding)
Just forward an email to a designated mailbox that we provide and it will be added as feedback right inside the app.
{% hint style="info" %}
You can create a nice-looking email handle in your domain (f.e. ) and configure rules to forward all emails to the email address that you can get in ProdCamp settings. Now, all the feedback that is sent to (for example) will go straight to the app.
{% endhint %}
**5.** [**Google Chrome Extension**](/feedback-channels/google-chrome-extension)
It's handy to have the ability to file customer feedback when you're browsing the web and you see something about your product.
Check [this link](https://chrome.google.com/webstore/detail/prodcamp-feedback-collect/mnadfjcojenaibiapciffiphnbkibiki) to download our Chrome Extension from the Google Chrome Webstore.
**6.** [**Intercom Messanger**](/integrations/intercom)
Let your customers leave feedback and upvote features right in the Intercom Messanger.
**7.** [**In-App Embeddable Widget**](/widgets/feedback-widget)
You can embed an easy-to-use javascript widget inside your app that your users can use to provide feedback right from there!
**8.** [**NPS Widget**](/widgets/nps-widget)
Measure how engaged your customers are and how it's changed over time.
# ProdCamp App
# Public Roadmap
# Feature Voting Portal
You can create a feature voting portal for each of your products like below:

In order to create one, you need to:
1. Make your public roadmap (feature voting portal is a part of a pubic roadmap module since it's basically a backlog).
2. Create a feature.
3. Make that feature public.
That's it, you have a feature voting portal.
Keep in mind to configure a [custom domain](/getting-started/custom-domain) for your feature voting portal.
# Email Forwarding
Forwarding emails is a very convenient way to file a feedback when you receive one.
### How it works
To save an email from a customer as a feedback record in ProdCamp you should forward it to a special email address that consists of a product ID that you can find on the "**Products**" page

and the "**@forward.prodcamp.com**" part, so it looks like ****
All the messages sent to this specific email will be recorded as feedback to the Product with this ID.
{% hint style="info" %}
The only requirement for the forwarded message is: **it must contain** a combination of words "**forwarded**" followed by an email address that it was initially sent from, f.e. "forwarded from " or the following block:
{% endhint %}
\---------- Forwarded message --------- \
From: Demo \
Date: Thu, 13 Dec 2018 at 17:53\
Subject: Test message\
To:
Such a block is created automatically when you forward a message from the Gmail interface, so you don't have to worry about it when forwarding messages from inside Gmail. Otherwise, you have to add such a combination manually.
# Google Chrome Extension
Working in Google Chrome and don't want to cruise between tabs? Just click on the extension and file feedback right there.
To install the ProdCamp extension for Google Chrome, open the link below:
{% embed url="" %}
After that, click on the ProdCamp icon at the extensions bar:

Sign in to the app.
Select the content that you need to pass to the system and click on the extension:

After that just hit Submit and it will be added to your account.
# Intercom Messanger
If you would like to add ProdCamp to your Intercom Messanger please read [this article](/integrations/intercom).


# Embeddable Feedback Widget
# NPS
Net Promoter Score for your application or a service.


To install our NPS widget to your app, check [this section](/widgets/nps-widget).
# Any App (via Zapier)
By integrating with Zapier, you unlock a limitless number of applications that can work together with ProdCamp.
To Integrate with Zapier, or find scenario examples, read this [page](/integrations/zapier).
# Installing widgets
How to install widgets into your pages
## Install widgets SDK
1\. Log in to your ProdCamp account. Go to the product details page of a product which widget you want to embed.
2\. Select the right product.
3\. Click on the "**Widget"**
3\. Click on the "**Generate**" button to generate the script code that you should insert at the end of the **body** tag on your page.
It will look something like this:
```javascript
```
After the system generates the script code - click on the text area and the code will be copied to your clipboard. Insert this code at the end of the **``** tag on your page, right before the **``** closing tag.
## Invoke a specific widget initialization function
Now you can invoke a command using the **`ProdCamp`** global function and initiate some specific widget, how to do it you can read in one of the following articles:
* [Feedback widget](/widgets/feedback-widget)
* [Changelog widget](/widgets/changelog-widget)
* [NPS widget](/widgets/nps-widget)
# Widgets SSO
How can I use SSO with widgets?
## What is Single Sign-On
If you have accounts of your users in your system - you can effectively provide this data to the widget using a JSON Web Token generated on your server to authenticate widget users. This mechanism is called Single Sign-On.
{% hint style="warning" %}
This is the preferred way of securing your widgets from unauthorized access and irrelevant feedback. You should **turn on the "*****Allow only protected requests*****" option** in the **Products -> %Productname% -> Widgets** tab in your ProdCamp workspace. This will ensure that only token-authorized requests will be allowed from your widgets and won't give you a chance to send any spam or irrelevant feedback.
{% endhint %}
## How do I set it up?
The process of generation of a token is the same as described [in this article](/roadmaps/single-sign-on#how-to-generate-a-token). For instance - the same token can be used to authenticate a user on your public roadmap automatically by providing him a link to your public roadmap with a pre-filled "**token**" query parameter (this way user will be automatically authenticated on your public roadmap and won't have to sign up himself).
## How do I pass the generated token inside widgets?
There is a bunch of ways of how you can do it:
#### 1. Set up initialization parameters before the widget SDK generated script code.
```javascript
```
####
#### 2. Use the ProdCamp SDK function
You can provide the token whenever you want using a special **ProdCamp** SDK function like this:
```javascript
ProdCamp('setToken', '{your_generated_token}');
```
####
#### 3. Async token generation function
When a user performs some action that requires to be authenticated (for example - send feedback), a special SDK method `ProdCamp.getToken` is being called. You should override this function by assigning one that requests a new token from your server each time the user performs an action. This function should have a callback argument that must be called when the new token is received from a server.
```javascript
ProdCamp.getToken = function( callback ) {
fetch('https://yourserver.com/get-sso-token/')
.then(response => response.json())
.then((data) => {
// get the token
let userToken = data.token;
// return the generated token to the widget
callback(user.Token);
});
};
```
# Changelog widget
How to install ProdCamp Changelog widget
1. Install the widget SDK by following the steps described below:
{% content-ref url="/pages/-MkT-mqpZEgkRg32PTEn" %}
[Installing widgets](/widgets/installing-widgets)
{% endcontent-ref %}
2. After installing the SDK code you need to add an attribute **data-prodcamp-changelog** to a button that you want to use to open the changelog widget, and after that - call the Changelog init function:
```javascript
```
It's recommended to place the script above in a separate \
block.
# Feedback Widget
How to initialize and use the feedback widget
{% content-ref url="/pages/-MkT-mqpZEgkRg32PTEn" %}
[Installing widgets](/widgets/installing-widgets)
{% endcontent-ref %}
## Initializing the feedback widget
Finally, after you've [installed the widget SDK](/widgets/installing-widgets) you have to invoke the "ProdCamp" init function to identify a user in your system that will be matched to a Customer Contact in ProdCamp (so you don't have to create a contact for every user via API manually - it will be created automatically based on the data that you provide in the init function. When a user sends feedback for the first time - a contact entity will be created or the feedback will be matched to an existing one compared by the provided email)
```javascript
```
{% hint style="danger" %}
We **strongly** **recommend** you use the SSO token for your security to authorize requests from your widgets and prevent irrelevant data (spam) as well as unauthorized access. [Learn how to set it up here](/widgets/widgets-sso).
For instance: if you set up the SSO token - you don't need to provide any initialization parameters to the widget, because it's already provided inside the token. If the data provided inside the initialization parameters doesn't match the one used inside the token - it will be just ignored by our servers and the one from the token will be used instead, anyway.
So, after setting up the token - you will have to just invoke the initialization function like in the following code and it will be enough:
```aspnet
ProdCamp('initFeedbackWidget')
```
The only situation when an email should be provided in both cases - is when you set up the async **getToken** function to receive a new token each time user performs an action.\
\
Before the user performs the first action - there will be no info regarding the user and the widget will show an "Email" field to be filled up by the user himself (which will actually be ignored after the token is received).
{% endhint %}
Those are the fields that you can provide in the init function:
* email
* company
* name
* revenue
* firstName
* lastName
* avatarUrl
The "**email**" field is the only **required** one and will be used as an identifier to create a new contact or match the provided feedback to an existing one.
The "**company"** property will be used to identify a Customer Account that the contact belongs to (if a Customer Account with such a name exists - the contact will be bound to this account, in other cases, a new Customer Account will be created with the name that was provided in the "name" field of the company property). When you provide a **revenue** field - it will update the Revenue field inside the provided account if it exists or set the revenue value in the newly created one.
If the "**company**" property is not provided - contact will be created along with a new customer account that will have the name same as the domain of the email provided in the init function if the domain is not of commonly used email services like "Google," "Hotmail," etc. Or the new account will not be created, but the contact will be bound to the "**No Account**" special customer account that exists in your ProdCamp from the start and collects all the contacts that can't be identified by their emails.
## Feedback widget commands
There are several commands that you can use to manipulate the feedback widget behavior
* **initFeedbackWidget** - this one you already know and it instantiates a feedback widget.
* **openFeedbackWidget** - this command can be used to open the widget manually from anywhere in your code
* **closeFeedbackWidget** - this command will close the widget
* **updateFeedbackWidgetUser** - using this command you can update the user that will be sent along with the next provided feedback. The format of the model that should be provided is the same as in the first init command.
* **destroyFeedbackWidget** - destroy the widget instance on the page
# NPS widget
How to install ProdCamp NPS widget


1. Install the widget SDK by following the steps described here:
{% content-ref url="/pages/-MkT-mqpZEgkRg32PTEn" %}
[Installing widgets](/widgets/installing-widgets)
{% endcontent-ref %}
After installing the SDK code you need to call the NPS Init function:
```javascript
```
## NPS widget commands
There are several commands that you can use to manipulate the feedback widget behavior
* **initNPSWidget** - this one you already know and it instantiates an NPS widget.
* **openNPSWidget** - this command can be used to open the widget manually from anywhere in your code\
To test the NPS widget manually, you can either call the following command in the browser's console
```javascript
ProdCamp('OpenNPSWidget')
```
or add a button to your page:
```html
```
* **closeNPSWidget** - this command will close the widget
* **updateNPSWidgetUser** - using this command you can update the user's email which will be used to determine when the widget should appear
* **destroyNPSWidget** - destroy the widget instance on the page
# Creating a Feature
1. To create a new feature you can go to Features on the main menu and click "New".

2\. Alternatively, when processing feedback you can create a feature right from the feedback record.

When creating a feature this is what you can provide:
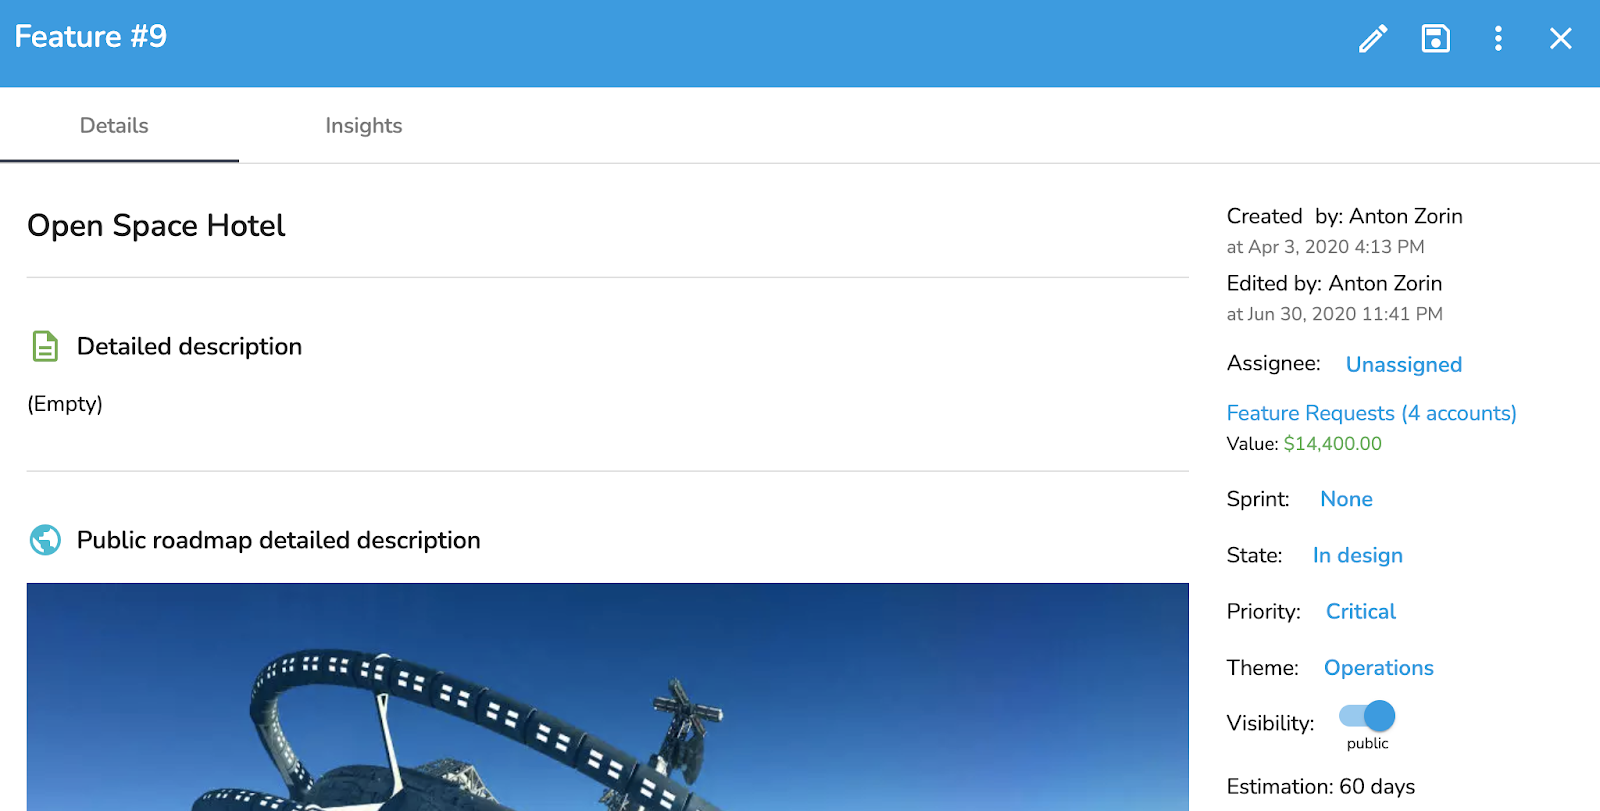
1. Feature name/Title (is the only one required)
2. Release notes brief description
3. Detailed description
4. Public roadmap short description
5. Public roadmap detailed description
6. Assignee
7. Sprint
8. State
9. Priority
10. Theme
11. Visibility (public/private)
12. Estimation (in days)
# Sharing Features on Public Roadmap
1. Make sure your product has a public roadmap with public access. Check [this article](/roadmaps/public-roadmap).
2. Now your roadmap is public, let's share features on it.\
Go to the Features and open a feature that you want to be displayed on your roadmap.

Check your public roadmap if the feature is there.
NB: make sure to read about [feature placement on the public roadmap](/roadmaps/feature-placement-on-the-public-roadmap).
# Push Feature to Jira
Create User Story in Jira based on a Feature
To send a feature as a User Story or an Epic in Jira follow these steps:
* Open a feature you would like to push to Jira.

* Click on **Push to Jira** button.

* On the top of the dialog select to either Push a feature as a new to create a new Story, Epic, or such or to link to the one you already have in Jira.
For pushing as new:
1. Select Jira Project.
2. Type the name that will be used in Jira.
3. Select what will that feature be: Epic, User Story, Bug, Task, or a Subtask.
4. Click Push.
For linking to existing:
1. Type the name.
2. Find the best match. If no matches found consider pushing as new.
3. Click Link
# Feature Releases
How to release a feature
## Release features with sprints
To release a feature (and make it available on the public roadmap "Released" section if it's publicly visible) you should [create a sprint](/sprints/sprint) and [add a feature to this sprint](/sprints/combining-features-to-a-sprint) or just attach it to an existing one.
You can [release this sprint](/sprints/sprint-releases) and it will update all the features that were attached to it making them "**Shipped**" and will send an email about released updates to subscribed customers [closing the feedback loop](/feedback-loop/closing-feedback-loop)
## Release a single feature
We're currently working on a feature that will make it possible to release a single feature without the need to create sprints.
You can subscribe to this [feature on our public roadmap](https://roadmap.prodcamp.com/224) to receive updates on it.
# Features and Sprints relation
{% hint style="info" %}
This is relevant to you only if you're using Sprints.
{% endhint %}
If a feature is not assigned to any **Sprint**, it will be placed in the **Backlog**. When a feature is in the Backlog - it's considered non-prioritized and you can prioritize it on the [**Prioritization page**](/prioritization/matrix)**.**
If a feature was set to be publicly visible - it will become available on the public roadmap. Depending on the assigned sprint it will either be located on the "Roadmap" or the "Backlog" pages of the public roadmap. Read more about it [here](/roadmaps/feature-placement-on-the-public-roadmap).
# Closing Feedback Loop
To be more successful, businesses must be with a customer-first mindset.
Receiving customer feedback is as important as acting upon it. Also, it's crucial letting customers know what is it you're planning to do.
To close the feedback loop with ProdCamp you can do it in an automated way:
Share the link to a feature with a customer and let them subscribe to updates.\
Read more on how you can subscribe to a feature in [this article](broken://pages/-MQmMHovdT5MamfizBEj).
## Notifying about received feedback
A customer gets notified when feedback that he provided gets into your ProdCamp account.

## Notify when feedback gets processed
When you set the received feedback **Status** to **Processed**, a customer that provided this feedback will be notified of this. This email will also include all the publicly available linked features that you add before changing its Status to Processed.

## Notify subscribers of updates
Customers that subscribe to features will get an email once these features are released.

At this point, it only works for those features which are publicly available. We'll be adding a way to notify customers of updates to private features in the future. Let us know if you'd like to expedite it.
# Changelog
Keep your customers in the loop of what you're working on.
## 1. What is Changelog?
Not to reinvent the wheel, let's check [Wikipedia](https://en.wikipedia.org/wiki/Changelog):
> A **changelog** is a log or record of all notable changes made to a project. The project is often a website or software project, and the changelog usually includes records of changes such as bug fixes, new features, etc.
Simply put, at ProdCamp changelog is a module that allows sharing a product's updates with its customer base.
## 2. How to make it public?
There are two ways of how to share your updates:
### 2.1 Share it on your roadmap
Creating a new changelog record will enable the section on your public roadmap (considering it's shared publicly).
### 2.2 Changelog embeddable widget
Alternatively, you can share your changelog in the embeddable widget.
To get the most out of it, use both: the changelog on the public roadmap and as an embeddable widget.
## 3. How to get started with Changelog?
### Create a changelog record
To create a record, go to the Changelog section on the main menu and click on "New entry".
\
You can create drafts and publish them when the time comes.
#### PRO Tip: To make your changelog more alive, consider adding animated GIF images.
## **4. Embedding Changelog in your app**
1. Go to the [products page](https://app.prodcamp.com/products) and open your product.
2. Head over to Widgets and click on the Generate button.
3\. Click on the first section with code called "Widgets SDK installation kit", it will copy the text to the clipboard and place it inside the `` tag on your page.
It will look similar to the following code
```markup
...
...
```
\
4\. Init the changelog widget on the page.
```markup
```
For example, here's what was needed to add a changelog button to our recent [blog post](https://www.prodcamp.com/blog/how-to-manage-customer-feedback):
```markup
...
```
Thank you!
Feedback is much appreciated.
**Check out our changelog:**
{% embed url="" %}
# Public Roadmap
Publish your product's roadmap with the world.
To make your roadmap public you will first need to make your product public.
PLEASE NOTE - Each public roadmap is linked to a specific product.
\
1\. Click on Products in the main menu.
2\. Select the product you would like to share.
3\. Here we have several fields that you can customize.
**Mandatory fields:**\
Product Name\
Subdomain (auto-generated)
**Optional fields:**\
Public Roadmap description\
Public Roadmap title\
Website link
You can also provide your:\
Product logo\
Product avatar\
Product favicon
And lastly, you can select which of these 4 tabs will be opened by default:\
**Your Roadmap** - features you decided to work on\
**Your Backlog** - features you haven't prioritized yet\
**Released features** - features you've already released\
(Usually, it's either the roadmap or the backlog)\
**Changelog** - your product updates
{% hint style="info" %}
All edits are saved as you type them.
{% endhint %}
And now click on "public roadmap" at the top of the page to enable public access to the page.

You will see your product page with the name you have specified. But it looks empty, right?
4\. Let's add some features to the public roadmap.\
Go back to the app and head over to Features on the main menu.\
If you have any features there, just open the ones you like and click on the Visibility toggle to make them public. If not, then [create a new feature](/features/create-a-feature) and make it public.

Now it looks much better 🙌
We also recommend reading about [Feature Placement on the Public Roadmap](/roadmaps/feature-placement-on-the-public-roadmap)
### Adding features to the public roadmap
Described [here](/features/sharing-features-on-public-roadmap).
# Single Sign-On (SSO)
## What is Single Sign-On
If you have accounts of your users in your system - you can effectively provide this data using a JSON Web Token generated on your server to authenticate users on your public roadmap. This mechanism is called Single Sign-On.
## How to generate a token
Here are the instructions on how to generate and use a token for signing in users automatically on your public roadmap or in your widgets
### Get required parameters from your ProdCamp account
* Login to your ProdCamp account (you must be an account administrator)
* Go to the **Settings** page and then to the **Workspace** tab
* On the **Workspace** tab, there are two important things that you will need to generate a token: **Workspace Id** and **Secret** key. You will need it a bit later in this article.
### Install library
First, you need to install a specific library for working with JWT tokens
{% tabs %}
{% tab title="Node.js" %}
```javascript
npm install --save jsonwebtoken
```
{% endtab %}
{% tab title="C#" %}
```csharp
# Read more here:
https://www.nuget.org/packages/System.IdentityModel.Tokens.Jwt/
```
{% endtab %}
{% tab title="Java" %}
```java
# Read more here:
https://mvnrepository.com/artifact/io.jsonwebtoken/jjwt/0.7.0
```
{% endtab %}
{% tab title="PHP" %}
```php
composer require firebase/php-jwt
```
{% endtab %}
{% tab title="Ruby" %}
```ruby
sudo gem install jwt
```
{% endtab %}
{% tab title="Python" %}
```python
pip install PyJWT
```
{% endtab %}
{% tab title="Go" %}
```go
go get github.com/dgrijalva/jwt-go
```
{% endtab %}
{% endtabs %}
### Generate the token
Copy and insert the **Secret** key from the **Workspace** tab to the SecretKey variable in the snippet. Fill in the user data by providing user email, first name, last name, etc., and the **Workspace Id**. Then encode this data using the secret key like it's shown below:
{% tabs %}
{% tab title="Node.js" %}
```javascript
var jwt = require('jsonwebtoken');
var SecretKey = 'your_secret_key';
function createToken() {
var userData = {
avatarUrl: 'user_avatar_url',
email: 'johndoe@foo.com' // required
firstName: 'John',
lastName: 'Doe',
company: JSON.stringify({
name: 'Foo Company',
revenue: 1000
}),
workspace_id: '01234567-1c34-1b34-1234-cecb45ab891f' // required
};
return jwt.sign(userData, SecretKey, {algorithm: 'HS256'});
}
var token = createToken();
```
{% endtab %}
{% tab title="C#" %}
```csharp
private static string SecretKey = "your_secret_key";
public static string CreateToken()
{
var securityKey = new SymmetricSecurityKey(Encoding.UTF8.GetBytes(SecretKey));
var credentials = new SigningCredentials(securityKey, SecurityAlgorithms.HmacSha256Signature);
var tokenHandler = new JwtSecurityTokenHandler();
// edited on Aug 3, 2023
// const header = new JwtHeader(credentials);
var header = new JwtHeader(credentials);
var tokenDescriptor = new SecurityTokenDescriptor
{
Subject = new ClaimsIdentity(
new List() {
new Claim("email", "johndoe@foo.com"), // required
new Claim("avatarUrl", "user_avatar_url"),
new Claim("firstName", "John"),
new Claim("lastName", "Doe"),
new Claim("company",
// Newtonsoft.Json library usage
JsonConvert.SerializeObject(new {
Name = "Foo Company",
Revenue = 1000
})
),
new Claim("workspace_id", "01234567-1c34-1b34-1234-cecb45ab891f") // required
}
),
// edited on Aug 3, 2023
// SigningCredentials = creds
SigningCredentials = credentials
};
var token = tokenHandler.CreateToken(tokenDescriptor);
return tokenHandler.WriteToken(token);
}
```
{% endtab %}
{% tab title="Java" %}
```java
import java.util.HashMap;
import io.jsonwebtoken.Jwts;
import io.jsonwebtoken.SignatureAlgorithm;
public class TokenFactory {
private static final String SecretKey = "your_secret_key";
public static String createToken() throws Exception {
HashMap userData = new HashMap();
// new CompanyDTO(companyName, revenue)
CompanyDTO companyDto = new CompanyDTO("Foo Company", 1000);
Gson gson = new Gson();
String companyJson = gson.toJson(companyDto);
userData.put("email", "johndoe@foo.com");
userData.put("avatarUrl", "user_avatar_url");
userData.put("firstName", "John");
userData.put("lastName", "Doe");
userData.put("company", companyJson);
userData.put("workspace_id", "01234567-1c34-1b34-1234-cecb45ab891f"); // required
return Jwts.builder()
.setClaims(userData)
.signWith(SignatureAlgorithm.HS256, SecretKey.getBytes("UTF-8"))
.compact();
}
}
```
{% endtab %}
{% tab title="PHP" %}
```php
use \Firebase\JWT\JWT;
$SecretKey = 'your_secret_key';
function createToken() {
$companyData = [
'name' => 'Foo Company',
'revenue' => 1000
];
$companyDataJson = json_encode($companyData);
$userData = [
'email' => 'johndoe@foo.com', // required
'avatarUrl' => 'user_avatar_url',
'firstName' => 'John',
'lastName' => 'Doe',
'company' => $companyDataJson,
'workspace_id' => '01234567-1c34-1b34-1234-cecb45ab891f' // required
];
return JWT::encode($userData, $SecretKey, 'HS256');
}
```
{% endtab %}
{% tab title="Ruby" %}
```ruby
require 'jwt'
require 'json'
SecretKey = 'your_secret_key'
def createToken()
companyData = {
name: 'Foo Company',
revenue: 1000
}
userData = {
email: 'johndoe@foo.com' # required
avatarUrl: 'user_avatar_url',
firstName: 'John',
lastName: 'Doe',
company: companyData.to_json,
workspace_id: '01234567-1c34-1b34-1234-cecb45ab891f' # required
}
JWT.encode(userData, SecretKey, 'HS256')
end
```
{% endtab %}
{% tab title="Python" %}
```python
import jwt
import json
secret_key = 'your_secret_key'
def create_token():
company_data = {
'name': 'Foo Company',
'revenue': 1000
}
company_json = json.dumps(company_data)
user_data = {
'avatarUrl': 'user_avatar_url',
'email': 'johndoe@foo.com' # required
'firstName': 'John',
'lastName': 'Doe',
'company': company_json
'workspace_id': '01234567-1c34-1b34-1234-cecb45ab891f' # required
}
return jwt.encode(user_data, secret_key, algorithm='HS256')
```
{% endtab %}
{% tab title="Go" %}
```go
import (
"github.com/dgrijalva/jwt-go"
"encoding/json"
)
const SecretKey = "your_secret_key"
type CompanyData struct {
Name string
Revenue int
}
func createToken() (string, error) {
companyData = CompanyData {
Name: "Foo Company",
Revenue: 1000
}
token := jwt.NewWithClaims(jwt.SigningMethodHS256, jwt.MapClaims{
"avatarUrl": "user_avatar_url",
"email": "johndoe@foo.com" // required
"firstName": "John",
"lastName": "Doe",
"company": json.Marshal(companyData),
"workspace_id": '01234567-1c34-1b34-1234-cecb45ab891f' // required
})
return token.SignedString([]byte(SecretKey))
}
```
{% endtab %}
{% endtabs %}
## How to use the token to authenticate public roadmap users
After that, you can use the generated token inside the query parameter of a public roadmap URL like **`https://roadmap.prodcamp.com?token={generated_token}`** and provide this link somewhere inside your app to quickly redirect your users to your public roadmap page where they will be automatically authenticated and will have the ability to leave feedback right away.
{% hint style="info" %}
You can also use this token to secure your widgets from any unauthorized access. [Learn more here](/widgets/widgets-sso).
{% endhint %}
# Feature Placement on the Public Roadmap
## General rules used to place features on the Public Roadmap
* For a feature to appear on the public roadmap - you should set its **Visibility** to be **public**
* The second important thing here is the **Status** property that can be set to **Backlog, In Progress, Soon, Future,** or **Released** and **Will Not Implement.**\
\
When you set the Status to one of the following: **In Progress, Soon, Future** - you'll see this feature on the **Roadmap** page of the public roadmap.\
\
Once you set the Status field to the **Backlog** value - the feature will be available on the **Backlog** page of the public roadmap.\
\
If you set the Status to **Released** you'll be prompted to confirm your choice, cause this action will lead to an official feature release that will also trigger sending notifications to all the feature subscribers, placing the feature on the **Released** page of the public roadmap, and also sending this feature to your **Changelog**.\
\
Setting Status to **Will Not Implement** will just mark the feature as Complete and it'll not be available publicly and on the Active tab of the Features page.
## Using Sprints Mode (deprecated)
After analyzing what kind of product we want to build we decided to deprecate the Sprints mode since it's more of a Project management tool than Product Management. If you think you really need it, please vote here:
### **Backlog Section**
If a feature is not assigned to any **Sprint** and is publicly visible - it's placed in the **Backlog** section of the public roadmap.

### Roadmap Section
If a feature is assigned to a **Sprint**, it will be placed in the **Roadmap** section.\
When a sprint is in the **Running** state, the feature will be added to In Progress column on the public roadmap page.
When a sprint's **Start Date** field is scheduled within the next 2 months, it will be placed in the **Soon** column.
When a sprint is scheduled to start later than 2 months, it will be added to the **Future** column.
{% hint style="info" %}
Later there will be an ability to change this 2 months period to whatever you like.
{% endhint %}


# Internal Roadmap
The Internal roadmap is a section of the service where you can see all your features grouped by themes and separated on which will be worked on when.
Here's a small example from our own internal roadmap.

You can switch which features will appear on a public roadmap and which will be internal.
# Protected Roadmap (beta)
Creating a Selective Access Roadmap
Sometimes, vendors prefer to keep their roadmaps away from prying eyes, especially competitors, while still being transparent with their user base. This is where the Protected Roadmap feature comes into play.
### What is a Protected Roadmap?
A Protected Roadmap is a roadmap that is accessible only to specific individuals. It ensures that only authorized users can view the contents while keeping it hidden from everyone else.
### How to Set Up a Protected Roadmap
Follow these steps to configure a protected roadmap:
#### Step 1: Create a Public Roadmap
Start by creating a [public roadmap](/roadmaps/public-roadmap). This will serve as the basis for your protected roadmap.
#### Step 2: Integrate with Single Sign-On (SSO)
Integrate your product or service with [Single Sign-On (SSO)](/roadmaps/single-sign-on). This will allow your users to use one set of login credentials to access the roadmap.
#### Step 3: Create a Redirect Link
Create [a redirect link](#step-3-create-a-redirect-link) to your public portal. This link should use a token generated from the SSO integration. This token will be essential in verifying the users’ identities and granting them access to the roadmap.
#### Step 4: Contact Us to Enable Protection
Reach out to our support team through the chat feature on [our website](https://www.prodcamp.com) and request to have your roadmap set as protected. This step is crucial as it ensures that only authorized users can access the roadmap.
#### Step 5: Understand the Authentication Process
Once the Protected Roadmap is enabled, users trying to access the portal will need to authenticate through their designated domain. If they don't have the appropriate authentication cookie in their browser’s local storage, they will receive an **HTTP 401 error** indicating unauthorized access.
### Need More Help?
If you have any questions or need further assistance in setting up your Protected Roadmap, please don’t hesitate to reach out to our [support team](https://www.prodcamp.com) through the chat.
# Sprints Mode
In case you're working in iterations
## What is a Sprints Mode
You can enable the Sprints Mode setting for your ProdCamp product workspace. It will let you work in iterations, assign features to a sprint, release features altogether. Features will have an additional State field that gives more project management functionality inside the app. You'll have an additional kanban board inside each sprint that can be used to quickly throw features between states and identify what feature to do next in the current sprint. Read the below sections to learn more.
## Enable the Sprint Mode
You can set the sprint mode ON for a product by going to the product details page and navigating there to the "Product Settings" tab

You'll see that there is a new menu option after you perform this action:

## Sprints Page
The Sprints page represents a page with a number of tabs. Each of them represents a sprint state.

On the **Now** tab you'll see sprints that have the **Running** state.
The **Archived** tab contains Sprints that are already **Released** or **Cancelled**
The **Soon** represent sprints that are in a **Planned** state and have an **End Date** property set to a date that is closer than 2 months from the current moment.
On the **Future** tab, you'll see Sprints that are also **Planned** but with the **End Date** set more than 2 months away from now.
Let's go to the Sprint details
## Sprint Details Page
The Sprint details page is a kanban board with some additional Sprint controls on the top toolbar

You can drag a feature from **To Do** column to the **In Progress** column and its **State** will change to **In Development** (note: this is not related to the public roadmap placement of the feature, it's described [here](/roadmaps/feature-placement-on-the-public-roadmap)). Or to the **Done** column and its **State** will become **Ready To Ship**.
# Create Sprint
Segment your work to iterations like sprints (or releases)
There are 2 ways how to create a sprint:\
A. Go to the Sprints section on the main menu and click "New Sprint".

B. Go to the Features section, check features that you want to add to a sprint and click on the running man.

When creating a sprint, provide the following data:\
1\. Sprint Name\
2\. Sprint Description (optional)\
3\. Sprint Start Date\
4\. Sprint End Date\
5\. Sprint Status
Sprints are important to display relevant information on your current progress and not to mislead your customers.
If you want to know how sprints' properties affect features' placement at the public roadmap, please check [here](/roadmaps/public-roadmap#feature-placement-on-the-public-page).
# Adding Features to a Sprint
We've covered one way of adding features to a sprint upon creation [here](/sprints/sprint).
There are also several other ways of adding features to a sprint:
1\. You can assign features to a sprint by simply clicking on the sprint field in the features list or in the feature details settings panel on the right.

2\. On the features list tick the checkboxes for needed features and click on the Sprint button to create a sprint.

3\. Heading over to the Sprints page and clicking on "New Sprint".

Upon sprint creating you can select the planned start and finish dates, and add features to the sprint by clicking the "Attach Features" select.

In case you're planning to share your roadmap with the world, please check how sprints affect feature placement on the public roadmap in [this article](/roadmaps/public-roadmap#feature-placement-on-the-public-roadmap-page).
# Sprint Releases
How to release a sprint
Sprints are released together with all the features that are attached to them. You can read more about changes to those features [here](/features/feature-releases). It will also notify all the feature subscribers about new updates via email.
## How to release a sprint
Go to the **Sprints** section and find a sprint that you want to release. Press the button in the **Status** column.

Choose the "**Done**" option from the dropdown list

You will be prompted to confirm the release. Just press the "**Confirm**" button and it's done!

Read more about [how features depend on sprints](/features/features-and-sprints-relation)
# Create and Manage Products
Learn how to get the most out of your product settings
In ProdCamp each product is associated with a distinct product roadmap.
After registration, you will be provided with a test product to give you a feel of the solution. To delete it and get started with your own please just drop us a note at , and we will be happy to help.
PLEASE NOTE - You will need a Pro and Business subscription to host and record feedback across multiple products.
Each of your products must be named and will receive a unique ID upon creation.\
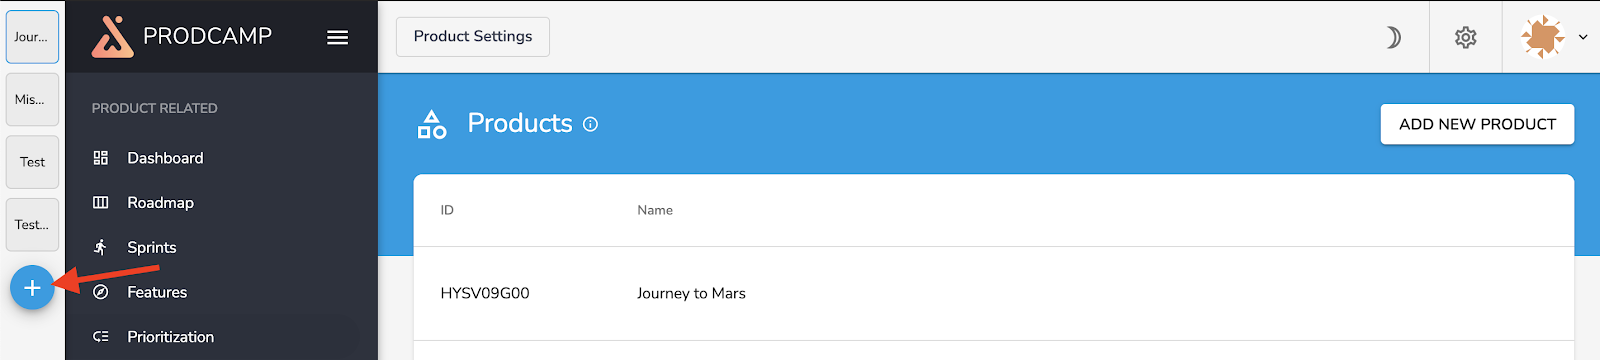
To add a new product click on the button in the far left of your ProdCamp console.
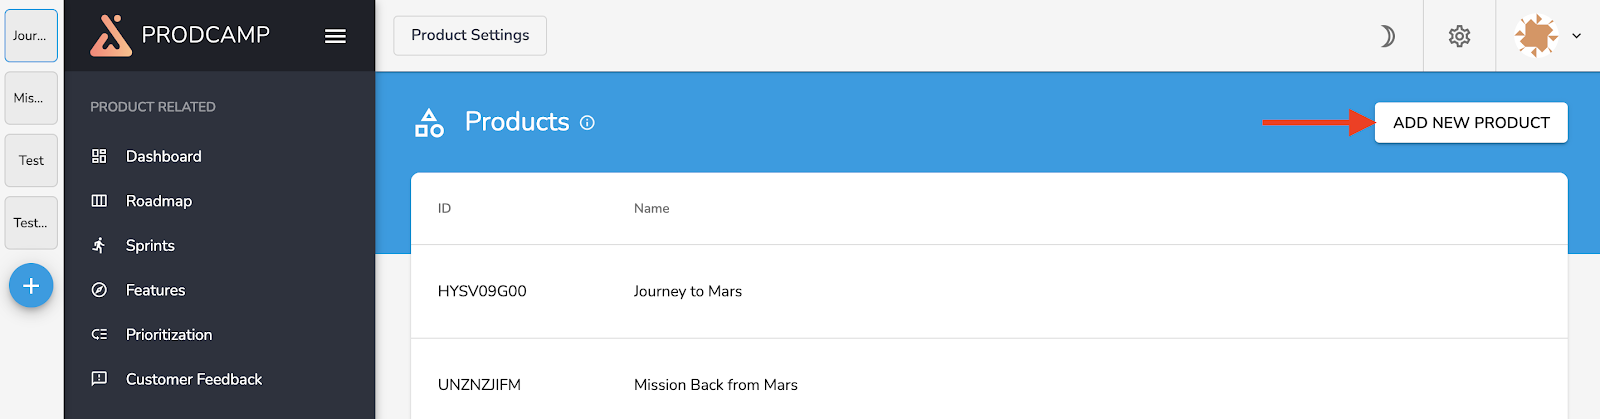
Or on Add New Product directly inside your product section.
Once you name it you will see the Product details window with 3 subsections.
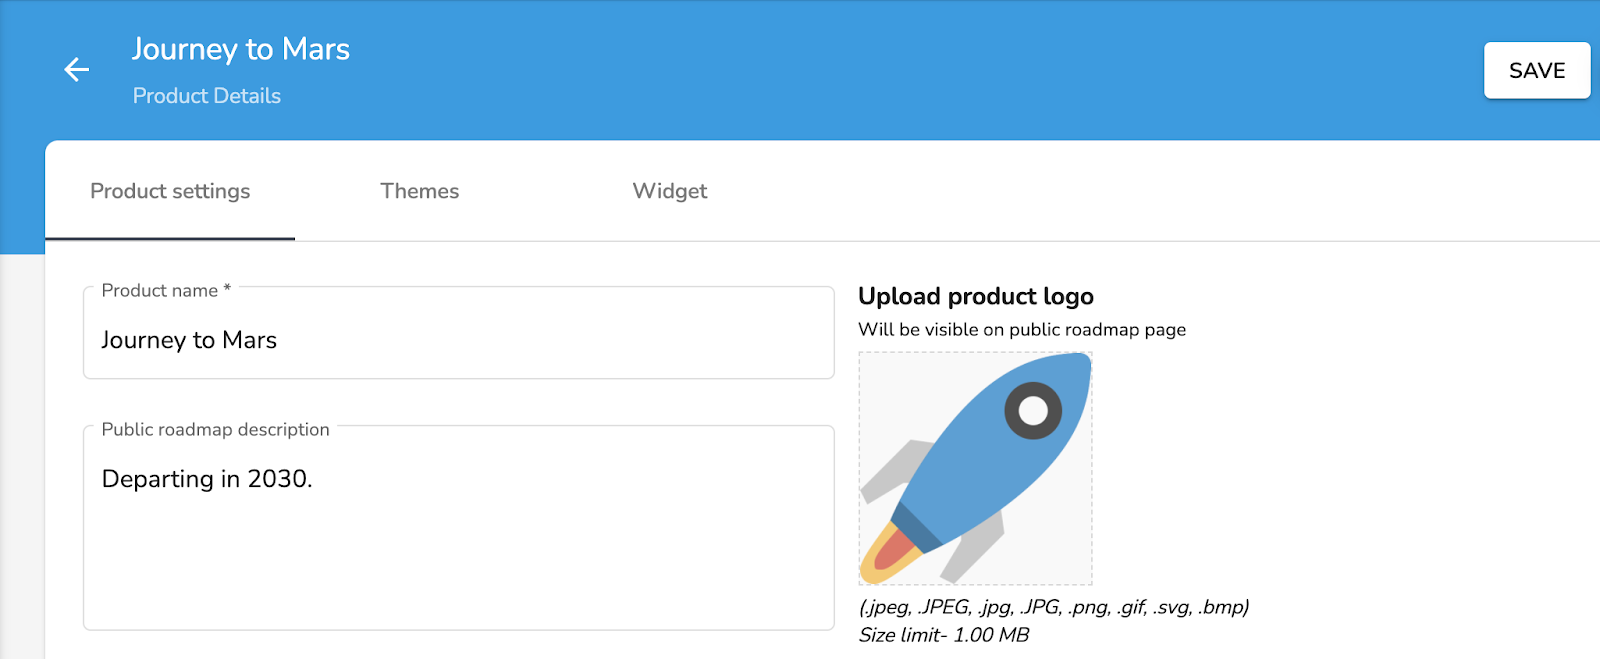
### Product Settings
Here is the place where you decide if you will make the features associated with this product available inside your public roadmap by turning on or off the public access and specifying your public roadmap subdomain.
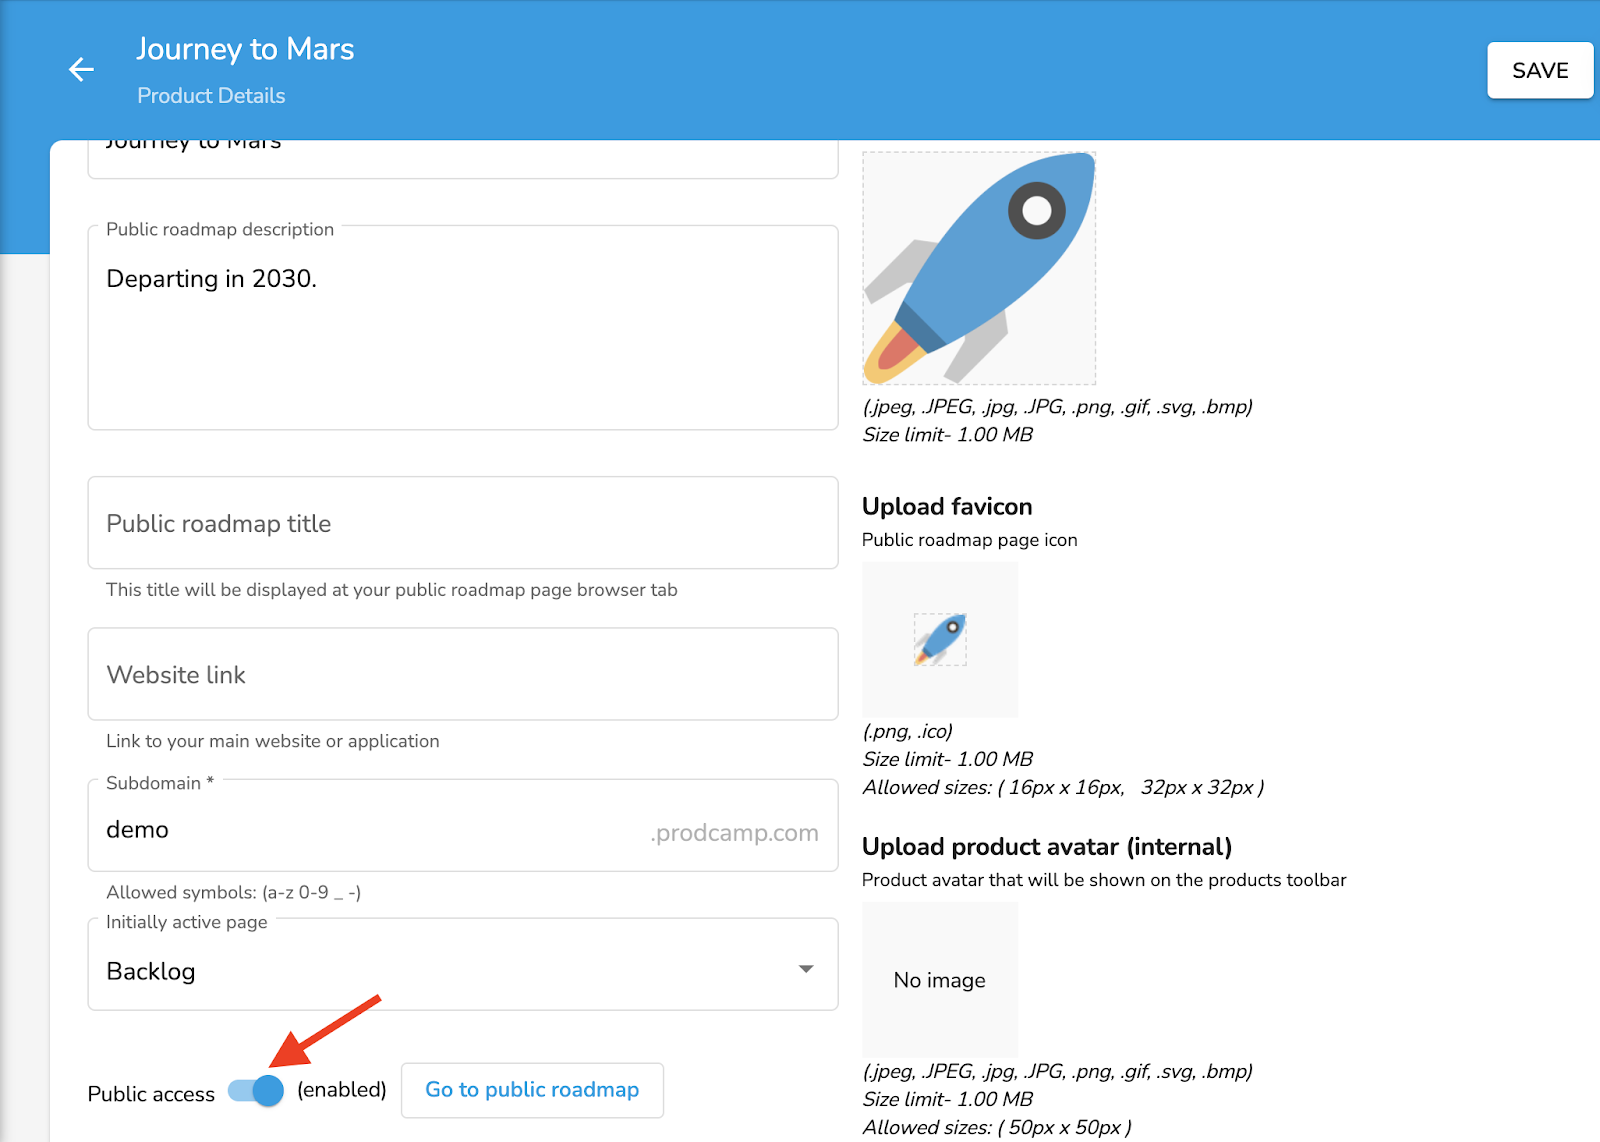
If you decide to make this product available publicly you will need to give your public roadmap
a description and a title, upload your product logo, favicon, and internal avatar to align with your brand, and implement redirect links leading to your main website or application.
Ultimately you will also have the ability to select what would be the default display of your Public Roadmap between your Backlog, Planned, and released feature.
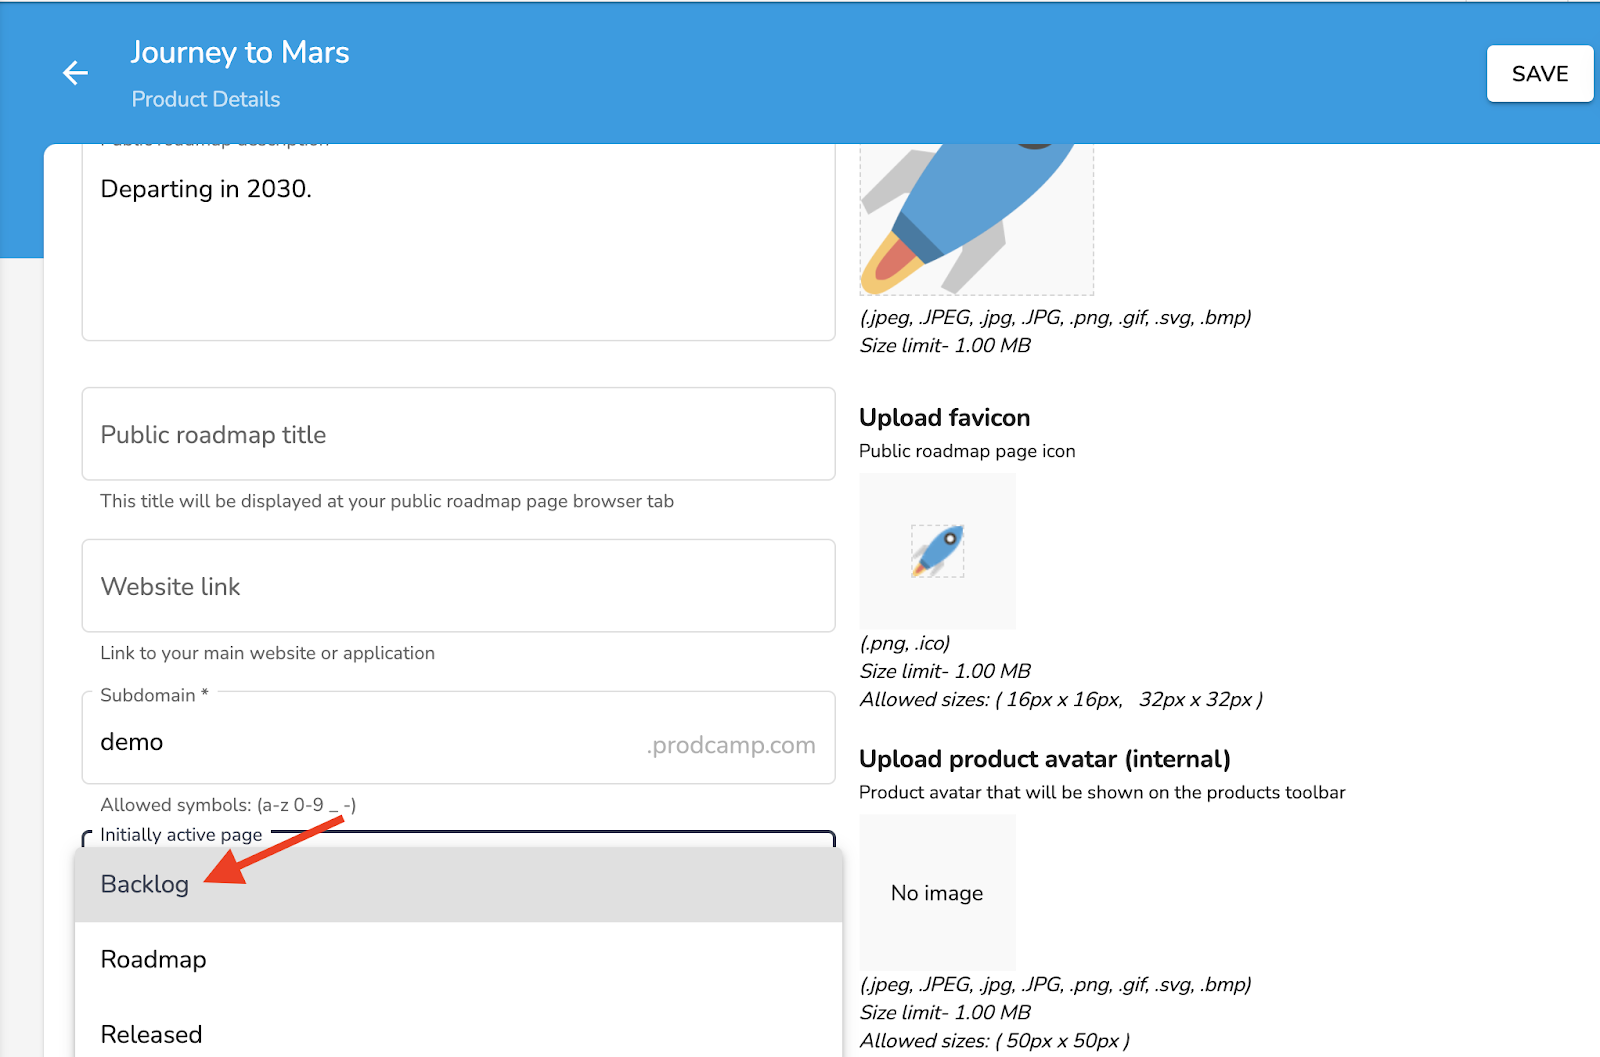
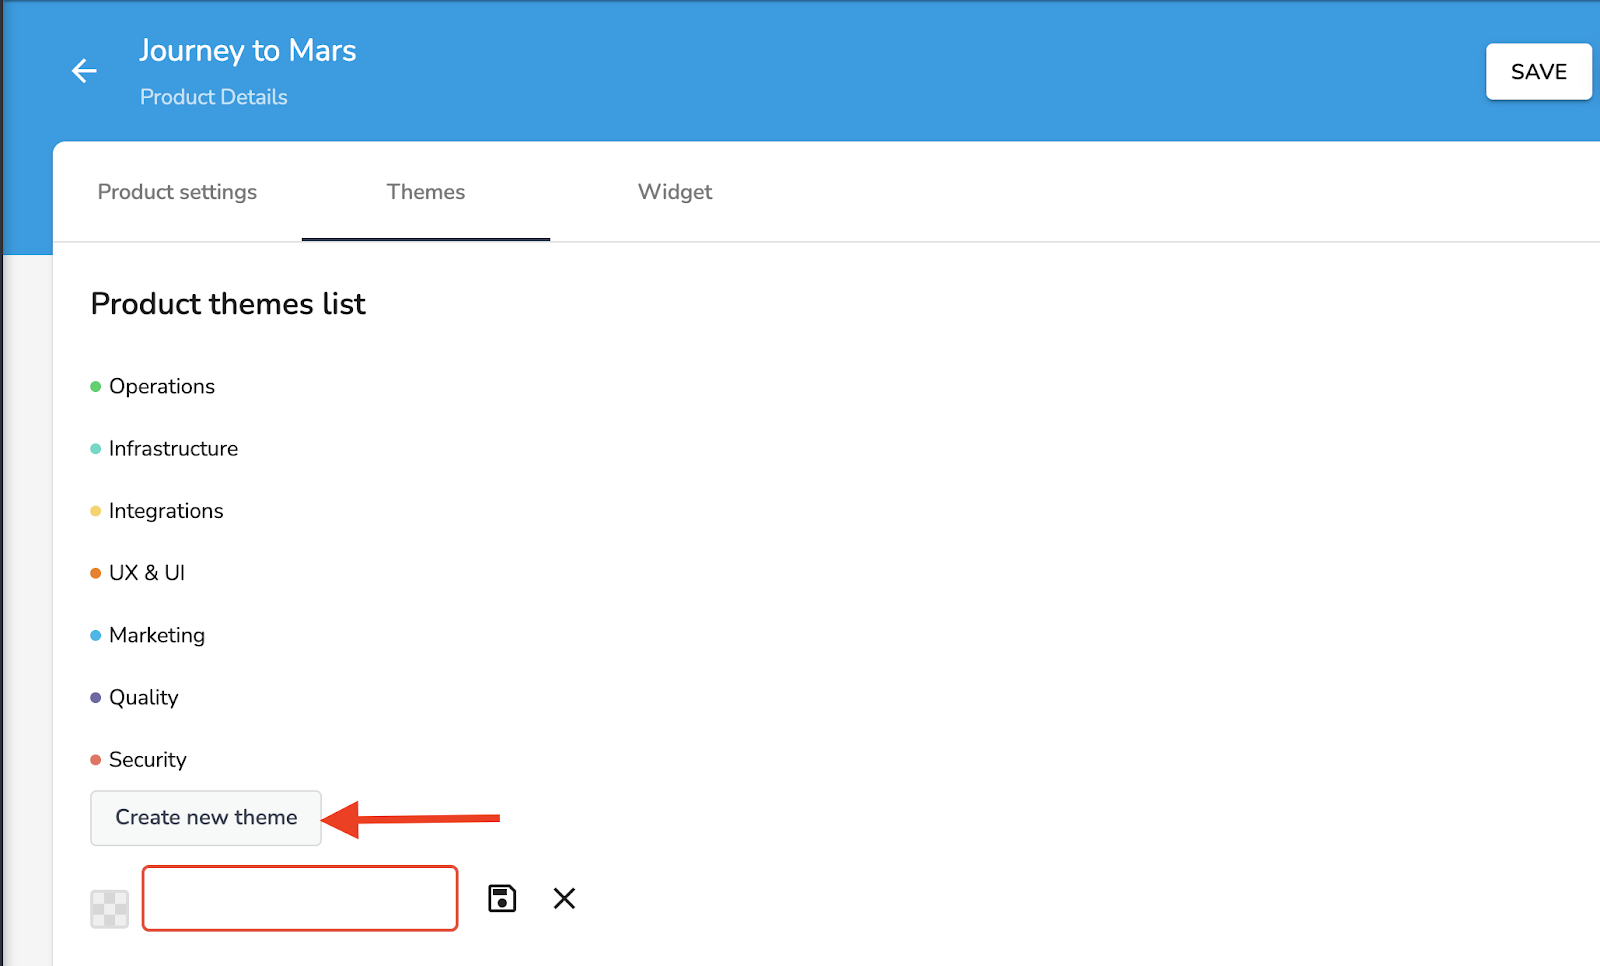
### Setup Themes
ProdCamp themes are the best way to organize your features into different categories and make sure that the features you're focusing on are aligned with your overall product strategy.
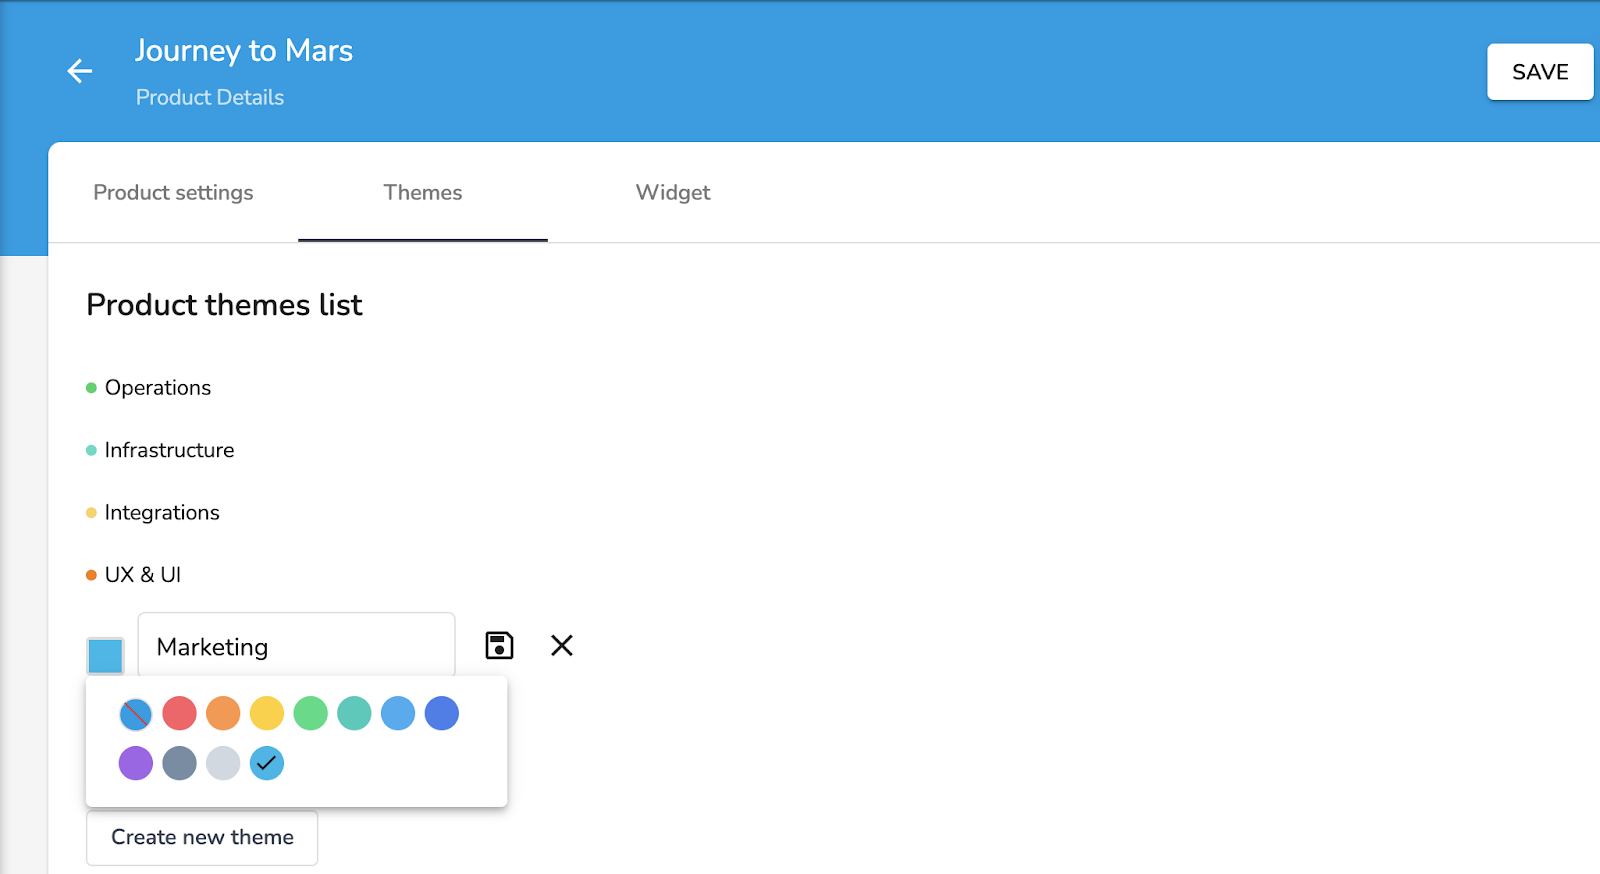
Since we know each organization has a different way of segmenting their work all themes names and colors are entirely customizable.
And you have the ability to create new ones using Create New Theme.
### Widget
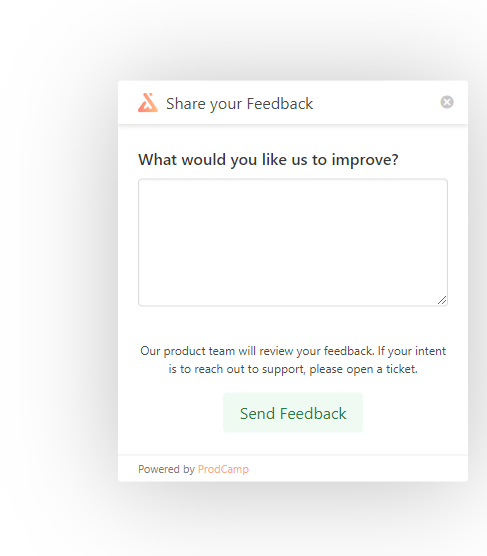
ProdCamp gives you the ability to create an embeddable widget directly inside your application and allows your users to easily provide feedback.
Check our help article to [learn how to activate your embeddable widget](https://help.prodcamp.com/feedback-channels/embeddable-widget).
**If you feel this article doesn't answer your question please feel free to drop us an email at **
# Prioritization Matrix
The prioritization section is designed to help you identify the most valuable backlogged features and select the ones that will have the most impact on your business.
### Prioritization Matrix overview
The prioritization panel is divided into two sections.
The left panel with filters (With Estimation, With votes) and the backlog feature list.
The right panel with the prioritization matrix itself.
The matrix X-axis reflects the feature's development ''estimation" while the Y-axis represents the number of upvotes received for this feature. The matrix is then segmented into four sections (Low priority, Quick Wins, Strategic, Hard slogs).
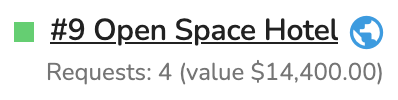
PLEASE NOTE - the more requests a feature receives the upper the circle. In the same way, a higher estimation would push the circle to the right of the matrix. Lastly, the larger the circle the more revenue this specific feature is likely to help you gain, grow, or retain.
What criteria can you use to prioritize your Product Roadmap with ProdCamp?
### **Feature Requests**
Requests are upvotes made by your customers directly on your Public Roadmap or by your team on your Protected Roadmap. It helps you determine how many prospects or clients are looking for such a feature.
### **Feature Value**
Having the number of companies interested in a specific functionality is great but knowing how much revenue it would actually help your organization gain, grow, or retain is much better.
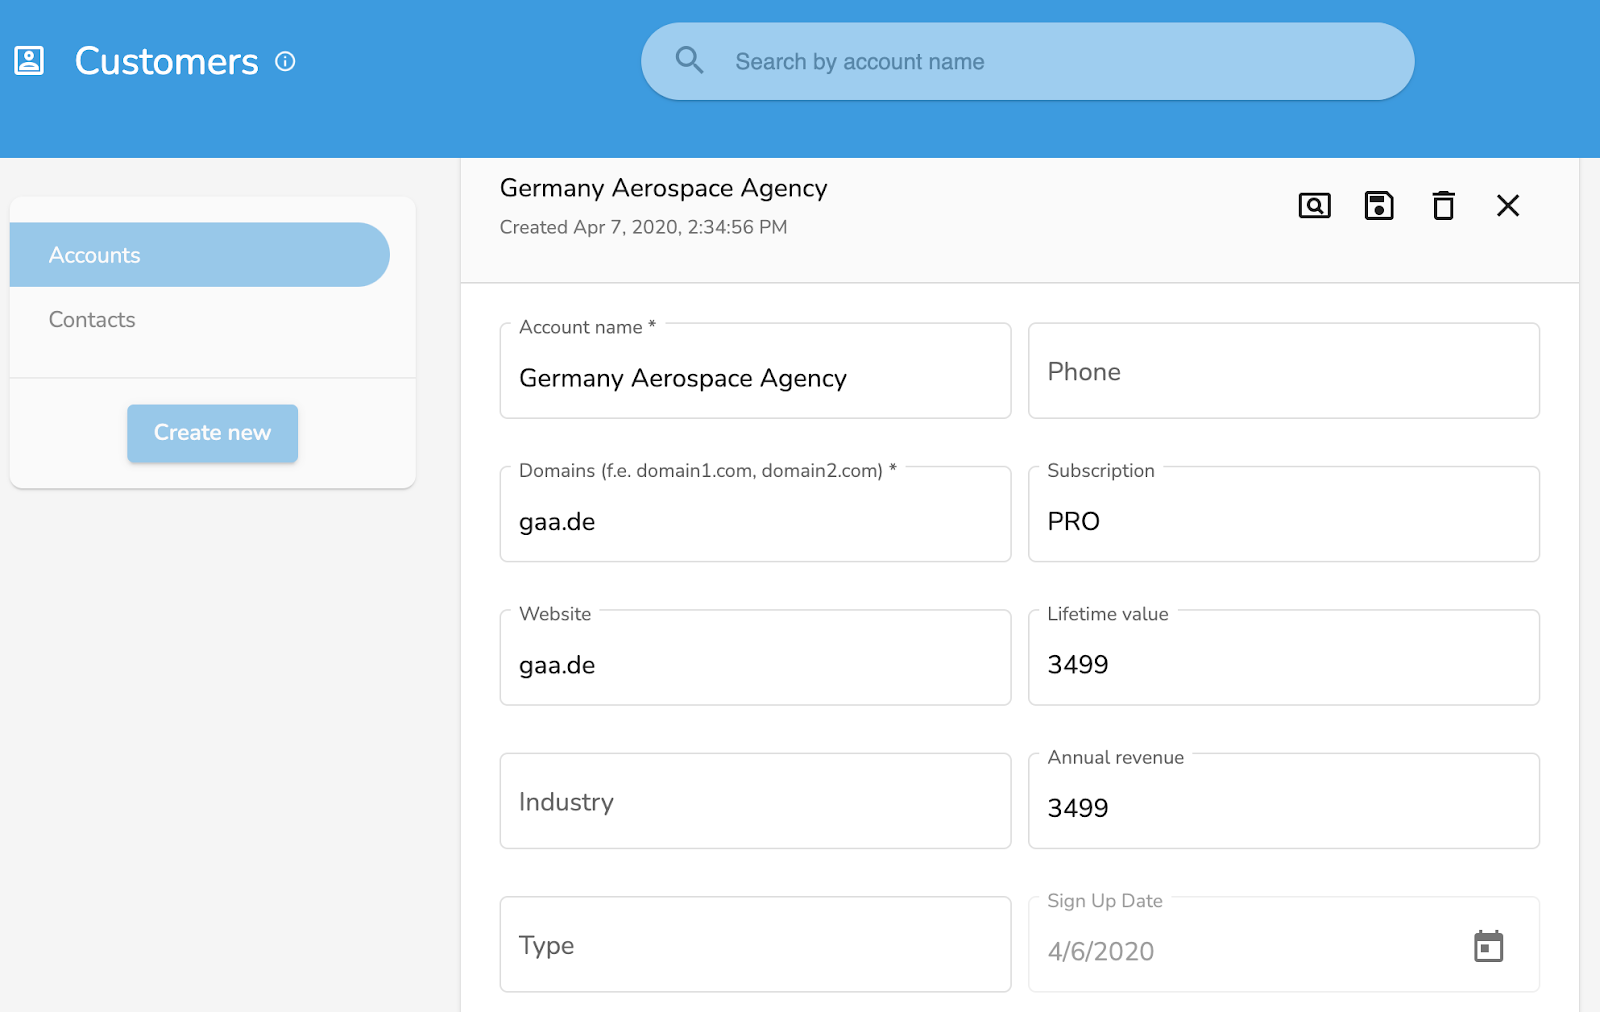
**PLEASE NOTE - ProdCamp allows you to specify the value of an account via a mini CRM available in your** [**Customers section**](https://app.prodcamp.com/HYSV09G00/customers/accounts)**. You can also connect it to your CRM (Salesforce) to automate the process. ProdCamp then aggregates the upvoters account value to help you rank features and prioritize your next sprint.**
###
### **Feature Estimation**
ProdCamp correlates Request counts and time Estimation to segment your features between Low Priorities, Quick Wins, Strategic, and Hard Slogs. You can use the estimation data to estimate the development time and the effort required to ship a specific feature.
### **How to prioritize a feature with the help of my prioritization matrix?**
To prioritize a feature please click on its circle in the matrix or in the list,
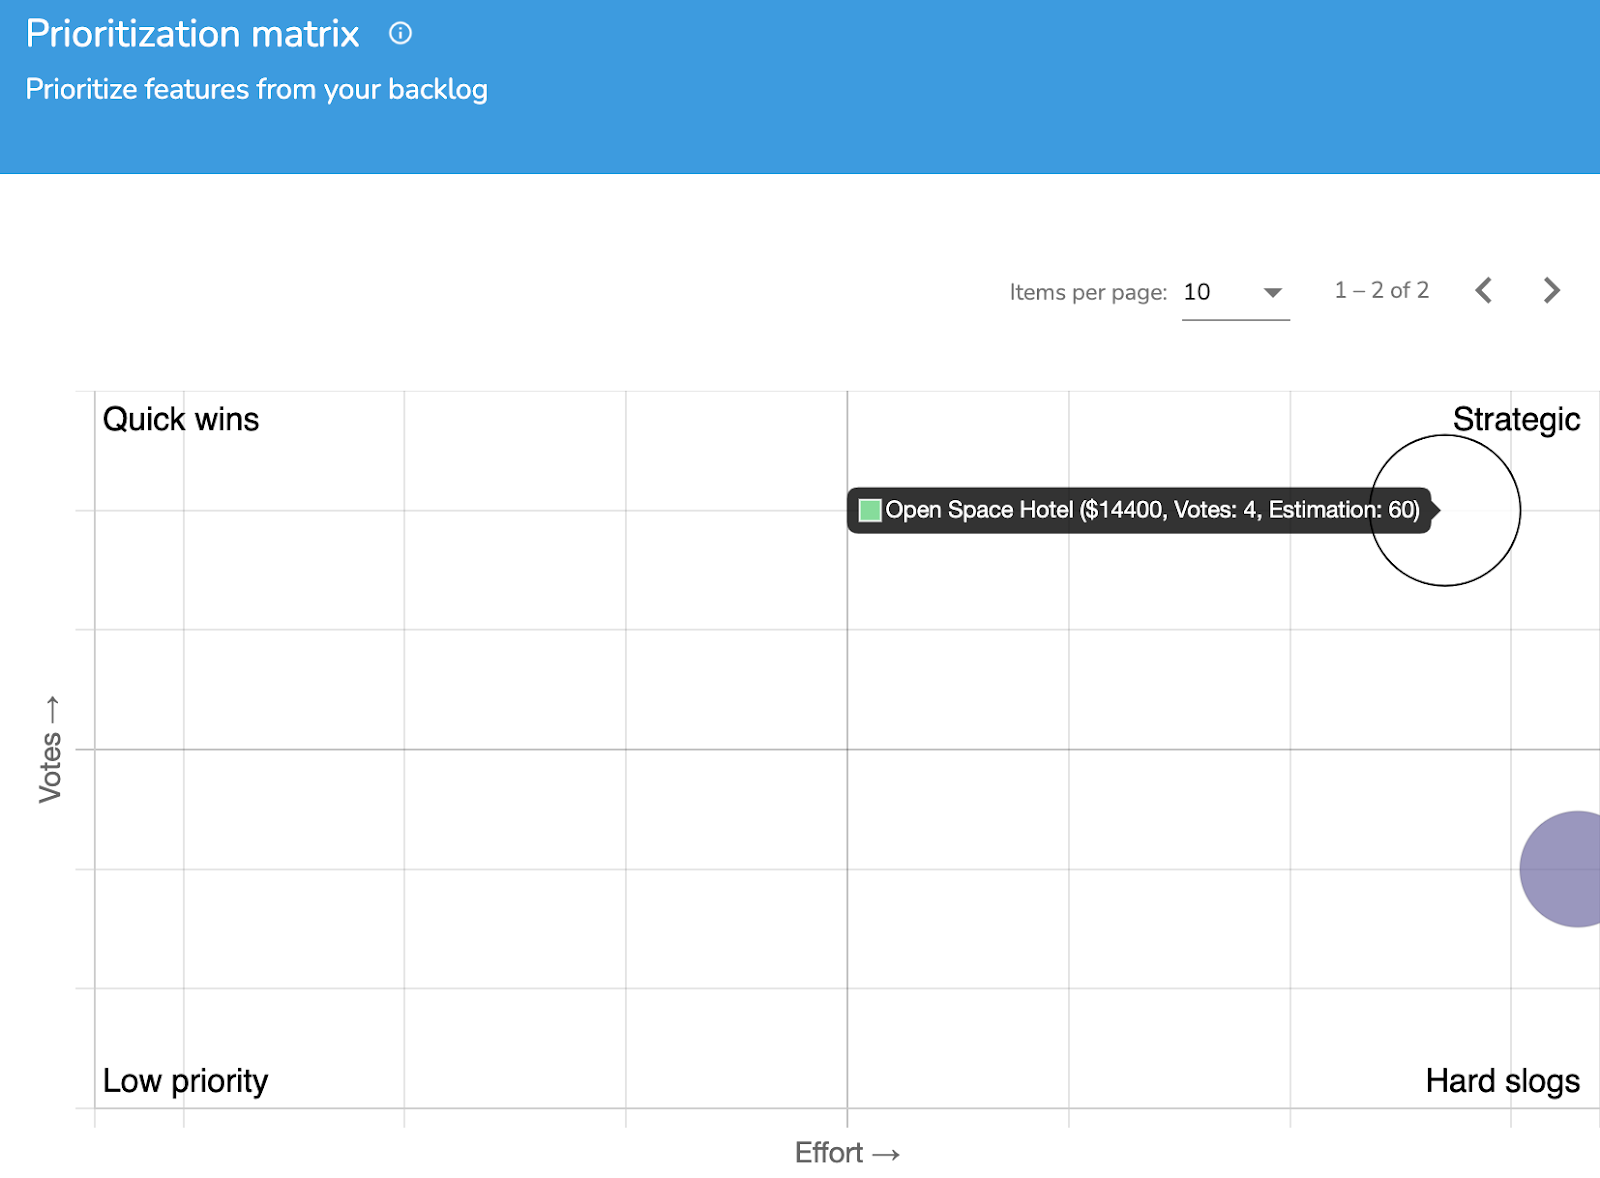
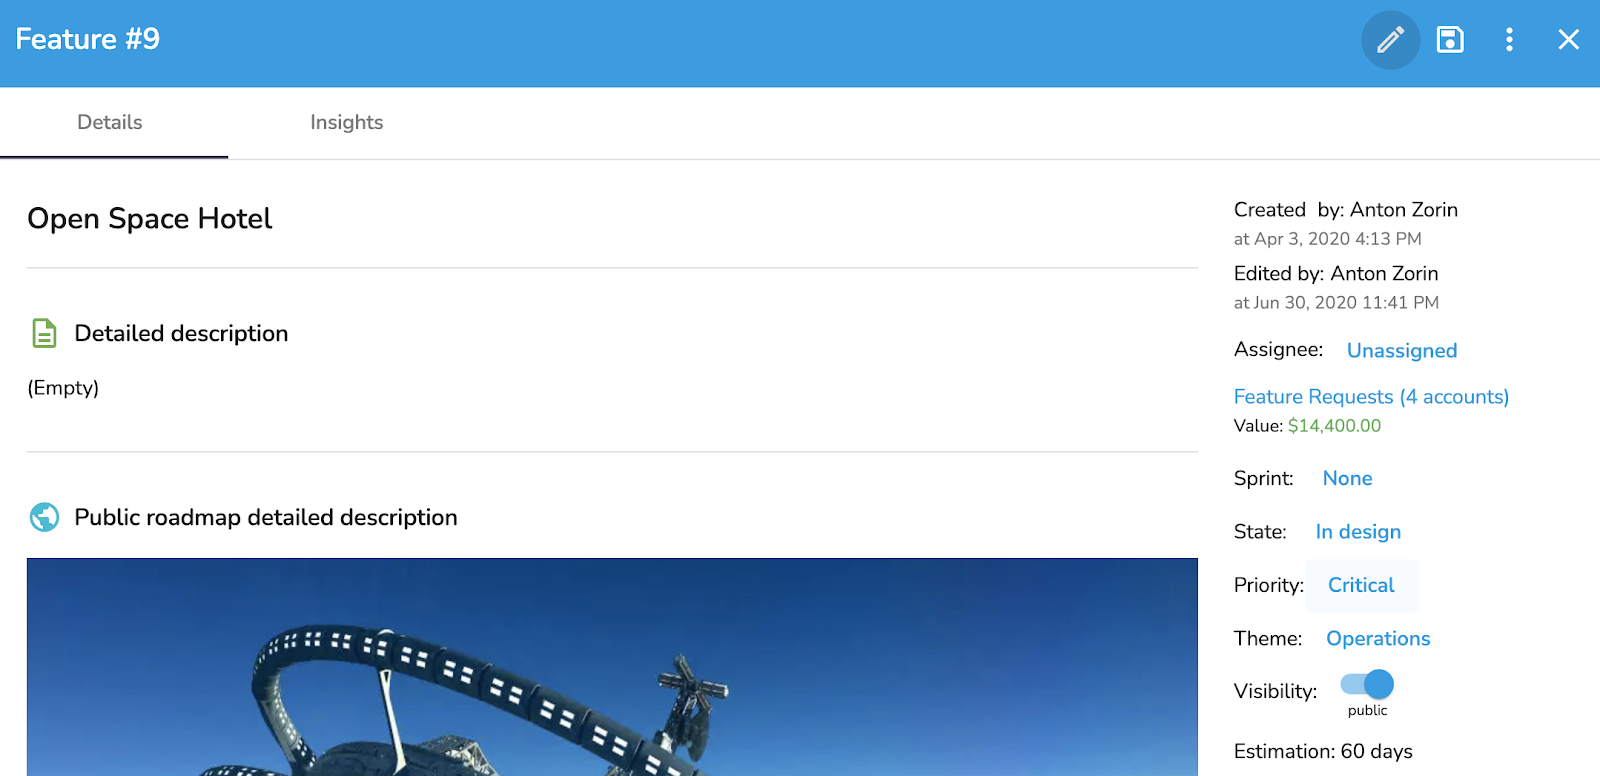
Select the appropriate feature and the feature details window will prompt.
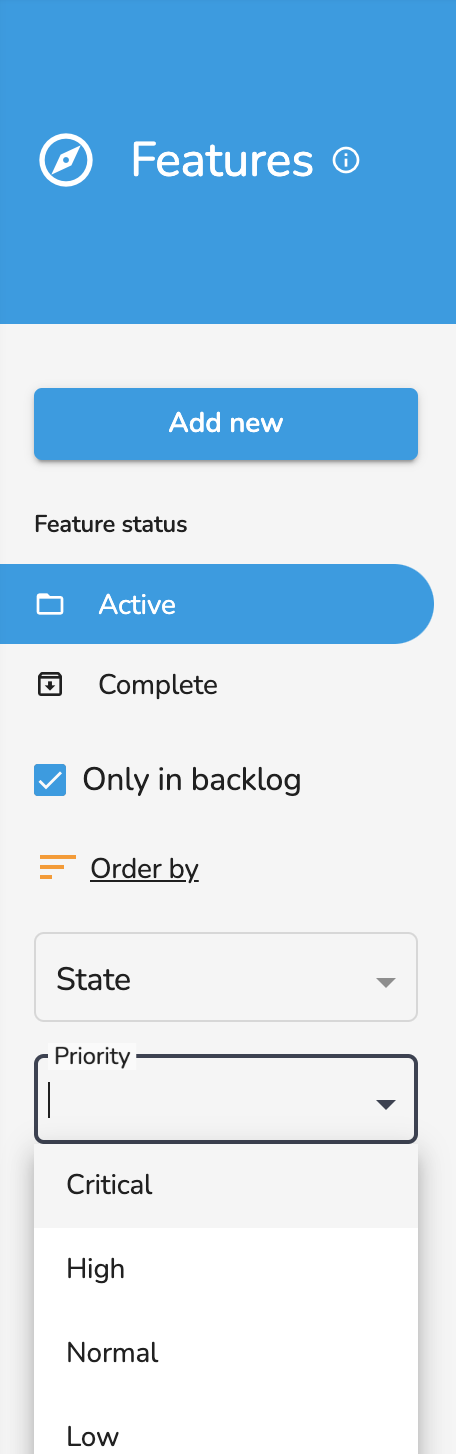
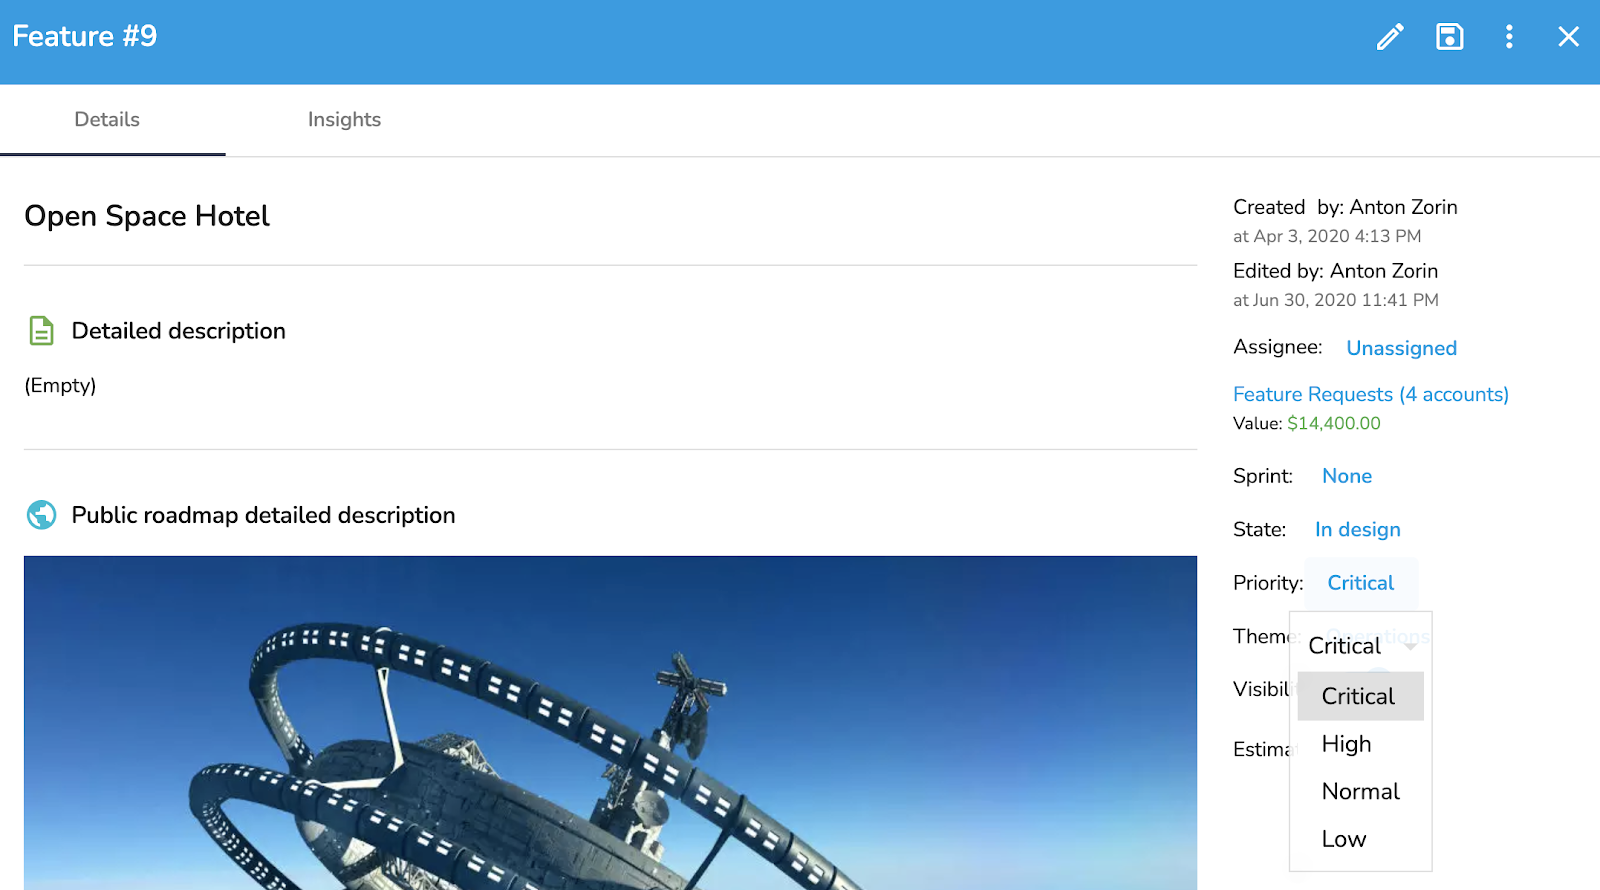
Click on your priority field on the right section and select the right one. Do that across all the backlog features you can/want to prioritize.
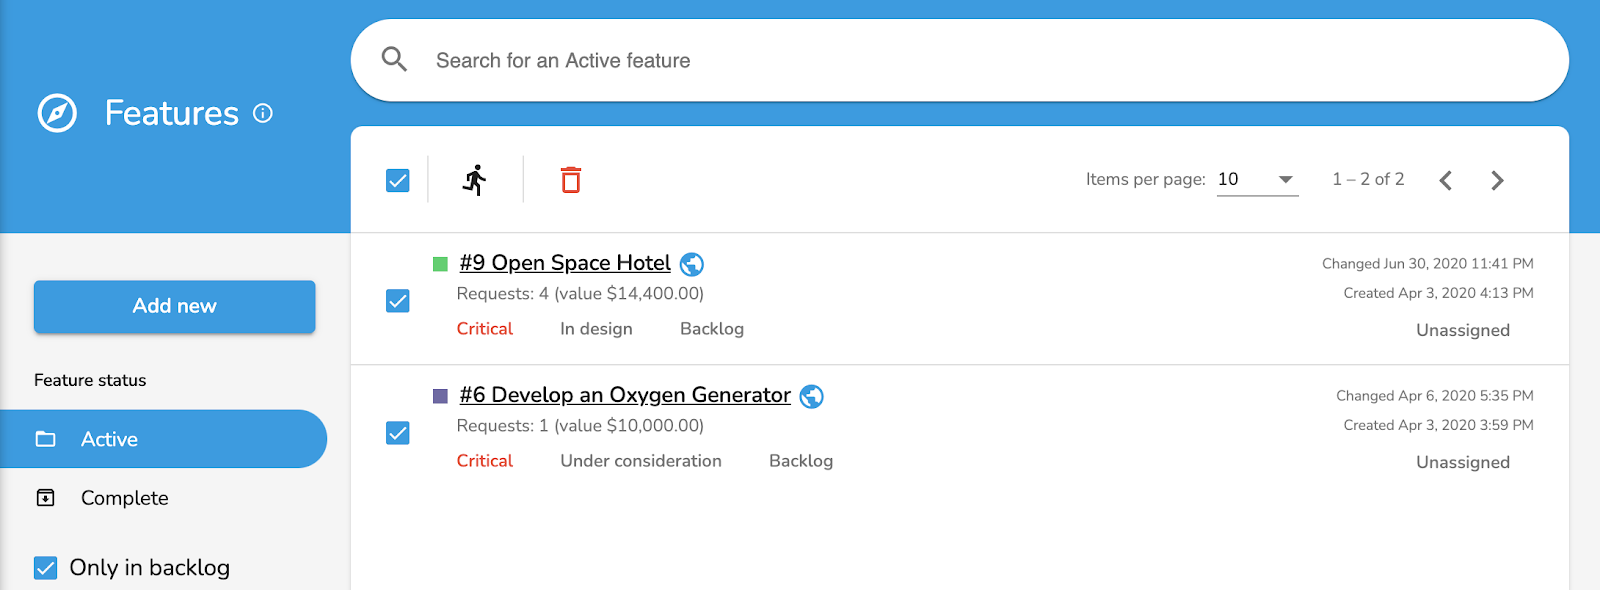
Then go to your [feature section](https://app.prodcamp.com/HYSV09G00/features), select ''Only in Backlog" and filter using the priority you've just set.
Select all the features you want to start working on, combine them in a sprint with an end and start date, communicate it back to your development team, or use our Jira Integration to push your Sprint directly in Jira.
Congratulations you are all set!
**If you have any questions or need help with prioritization please feel free to contact us at **
# RICE Prioritization
Reach-Impact-Confidence-Effort prioritization
If you're not familiar with RICE, please read [this](https://www.prodcamp.com/blog/how-to-prioritize-product-features-quick-guide-to-product-prioritization) article about different approaches to feature prioritization.

To get started with RICE prioritization head over to the Prioritization page.
1. Give your board a name.
2. Add some features to the board.
3. Click on the gear button to configure all of the prioritization settings for your board.\
\
Below is the default list of factors for the RICE board, you can configure additional impact factors as you please.

Here's an example of a non-default prioritization configuration:

Finally, we'll have this configuration:

# Manage Accounts and Contacts
ProdCamp customer center is a mini CRM designed to help you leverage customer account and contact information to make better decisions.
There are only several ways to start leveraging your customer data with ProdCamp:
Create Contacts and Accounts manually - which is a viable option only for small organizations.
### **Create an account**
To manually create an account please go to your customer section and click create new.

Specify the Account name and one or multiple domains associated with it and hit save.

### **Create a contact**
To create a new contact, select Contacts, and create new.

Then complete the form and don't forget to specify the account attached to this contact.
PLEASE NOTE - To identify the feature value the system aggregates all the revenue associated with the accounts which upvoted this feature and are recorded in ProdCamp. Since upvotes are provided by contacts and not accounts your contacts must be associated with an account in order for the system to retrieve the revenue and feature value insight.\

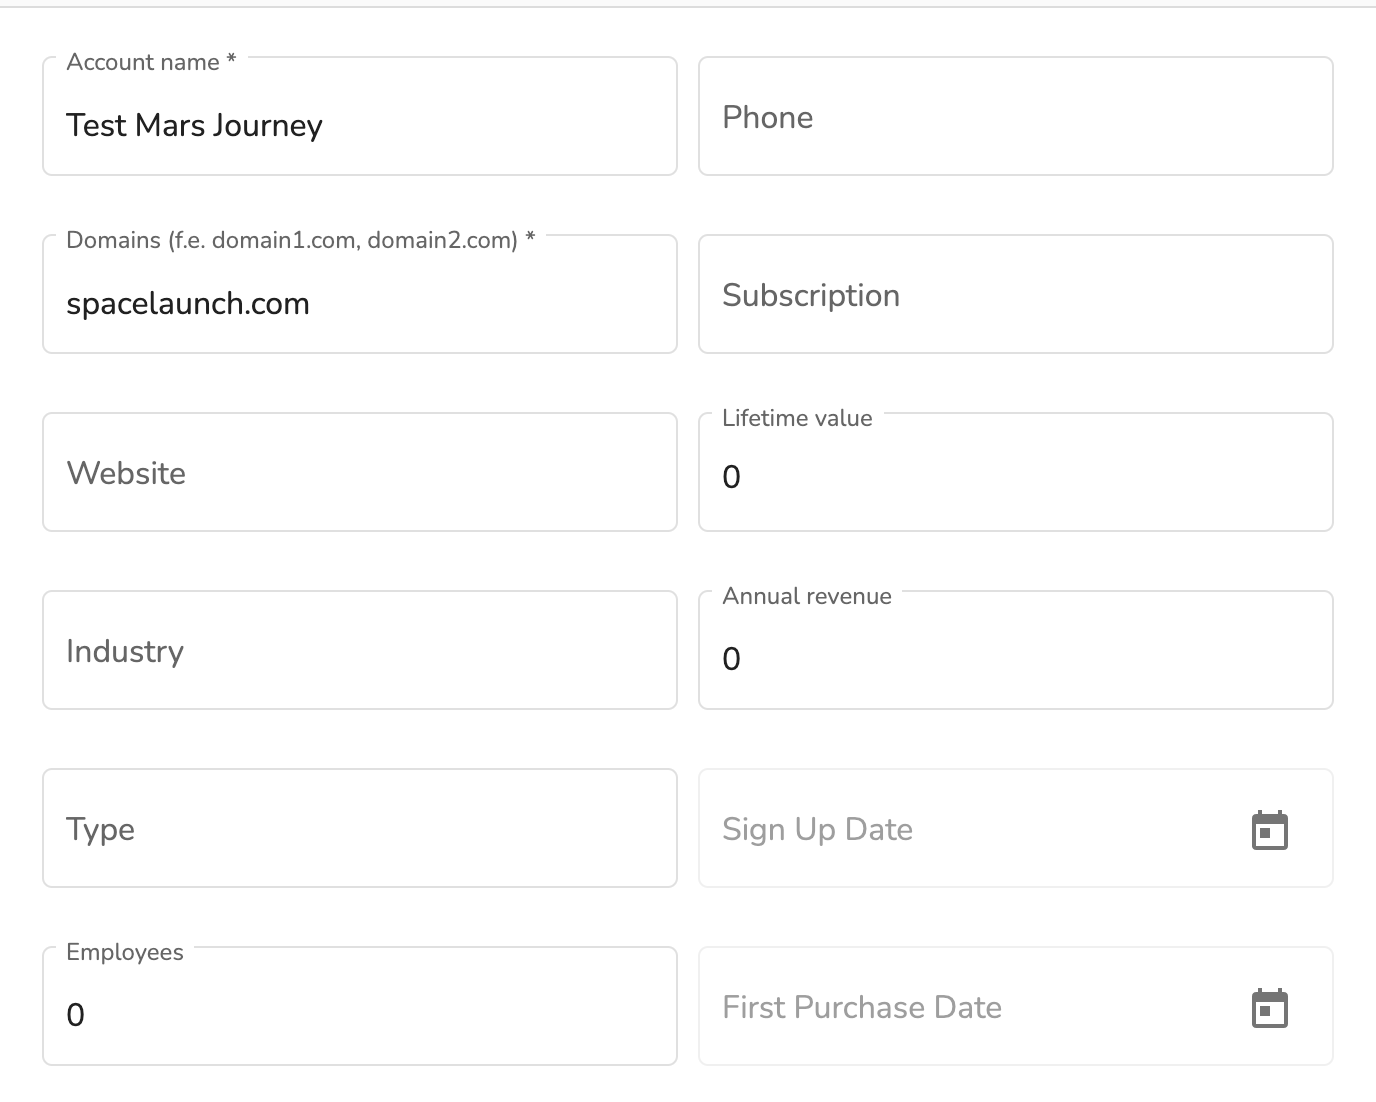
PLEASE NOTE - To update industry, type, Annual revenue, lifetime revenue, or any additional account field please first create the account and then edit it.
Once the account is created click edit and input the information you need in the extended form.
### Import contact**s** and accounts information
from a CSV via ProdCamp ''import section". See [Import Section](https://help.prodcamp.com/operations/import-customers).
Turn on ProdCamp native CRM integration - available for supported systems only (currently Salesforce)
Read more about the [Integration Section](https://help.prodcamp.com/integrations/salesforce).
How to gain more insights with ProdCamp Customer Center?
ProdCamp customer section allows you to take a closer look at some of your strategic accounts to gain more insights.
You can easily identify if your customers provide feedback and through which feedback channel.

Or what features are they interested in, and in which area of the product.

**If you have any questions or need help with your customer center please contact us at .**
# Sync Accounts with SalesForce
First things first, please check our Salesforce integration [article](/integrations/salesforce).
Once the integration is configured, the sync process will kick off automatically.
Depending on the number of accounts, contacts, and the queue It might take some time to sync it.
# Slack
Send new feedback from ProdCamp to your slack channel
### Connect your ProdCamp account to your Slack workspace follow these steps:
1\. Go to "Workspace Settings" by clicking the gear button in the top right corner of the screen.
2\. Click on the Integrations tab.
3\. Click on the Slack to expand it
Connecting ProdCamp to Slack Workspace to receive feedback notifications
4\. Click on the "Connect" button and it will redirect you to the slack authorization page where you should choose a channel to which the ProdCamp slack app will post. And then click the "Allow" button.
ProdCamp Slack integration oauth scope
#### Congratulations! Slack is now integrated to your workspace. 🙌
# Jira
Push your features to Jira and sychronize them between two systems.
### Integrating with Jira Cloud
To configure your ProdCamp integration with Jira Cloud you need to take several steps.
1 Click on the Gear button on the top right.
2 Head over to the Integrations section.
3 Click on Jira to expand the accordion.

4 Click on the Connect button. You will be redirected to the Jira SSO page.
5 Select the project in the "Authorize for" drop-down.

6 Click Accept. You will be redirected back to your ProdCamp account. \
Now you'll have a "**Push to Jira**" button on each feature details page, in the right info column. \
This button will be changed to **Issue status** from Jira when the feature-issue connection will be performed.

### Set webhooks in Jira
Now it's time to set webhooks in Jira to be able to synchronize changes back from Jira into ProdCamp (you need to have **Admin Jira Global Permission** to perform these actions).
1 Press the gear button in the top right corner, then click "**System**". Under "**Advanced**", select "**WebHooks**".


Press the "Create a WebHook" button in the top right corner.
In the "**Name**" field you can name this webhook as you like, for example, "ProdCamp webhook".
Status should be set to "**Enabled**". In the "**URL**" field insert the following URL: `https://app.prodcamp.com/api/integrations/jira/webhooks/issue`
Then you need to allow posting some Issue related events in the "**Events**" section (Issue: **created**, **updated**, **deleted**) according to the following screenshot:

Go to the very bottom of the webhook creation page and press the "**Create**" button.
**Congratulations!** \
**The integration is configured now 🌟**
Check how to [Push Feature to Jira](/features/push-feature-to-jira)
# GitLab
Push your features to GitLab and synchronize them between the systems.
### Integrating with GitLab
To configure your ProdCamp integration with GitLab OnPrem and Cloud you need to configure from both sides: GitLab and ProdCamp.
### Create ProdCamp app in GitLab
4. Open the Admin Area of GitLab.
5. Open Applications. The link should look like this:
6. Click On "Add new application".
7. **Name: ProdCamp**
8. **Redirect URI:** [**https://app.prodcamp.com/api/integrations/gitlab/callback**](https://app.prodcamp.com/api/integrations/gitlab/callback)
9. Select "Trusted".
10. Scope: Select only "API".
11. Copy the Application ID and Secret to ProdCamp.
### GitLab Integration Configuration in ProdCamp
Click on the Gear button on the top right.
1. Head over to the Integrations section.
2. Click on Jira to expand the accordion.
3. Paste the Application ID and Secret from GitLab.
4. Click "Save and Connect".
**The integration is configured now 🌟**
# SalesForce
## Integrating with Salesforce
To integrate your Salesforce CRM account with ProdCamp please follow the steps below.
1\. Click on the Workspace Settings button (or [here)](https://app.prodcamp.com/settings) to go to the Settings page.

2\. Click on the [link](https://login.salesforce.com/packaging/installPackage.apexp?p0=04t3i000002DEjd) to install the ProdCamp app for Salesforce.\
3\. You will be redirected to the Salesforce sign-in page.\
4\. After sign-in, you will be redirected to the application page. Check the checkbox and click Install.

When it's installed, click Done.

5\. Head back to the app and click Authorize.

6\. Authorize the app to work with your Salesforce account by clicking Allow.
7\. Test your connection to Salesforce.
Salesforce is now integrated ✅
## Deleting the integration
Go to Settings -> Integrations -> Salesforce
Click on the Disconnect button.
Then go to your Salesforce account and manually delete the ProdCamp application.
That's it.
# Intercom
Integrating ProdCamp with Intercom
There are three scenarios of how you can use Intercom with Prodcamp.
To get started follow these steps:
### Connecting ProdCamp to Intercom
There are 2 ways to integrate with Intercom:
Option 1:
Open the link below and click on "Sign in to Install".\
Option 2:
1\. Sign in to your ProdCamp account [here](https://app.prodcamp.com/?ref=help-intercom).
2\. Open the [Settings page](https://app.prodcamp.com/settings) and click Integrations on the top.
3\. Click on the Intercom section to expand and click on the "Connect with Intercom" button.

### Voting for a feature on behalf of a user in the Inbox
Best practice: it's only a good idea to upvote a certain feature if you're sure it's what the customer needs. If you're not sure, create a new feedback record to be processed by a person in charge of feedback collecting from a product team.
1\. Inside the Inbox conversation, click on the ProdCamp icon.
2\. Type keywords for the feature that a user has requested.
3\. Choose the best fit from the results and click on the upvote button.
4\. The link to the feature will be added to your next reply automatically. Just click Send.
### Capturing user feedback in the Intercom Inbox
1\. In the Intercom Inbox, click on the ProdCamp icon.
2\. Click on the "Submit New Feedback" button.
3\. Paste feedback content from the clipboard.
4\. Click Submit.
### Sharing your product roadmap on the Intercom Messanger Home
1\. Go to the messenger settings.
2\. Scroll down and click "Add apps to your Messenger."
3\. Click on "Add an app."
4\. Scroll down and click on the ProdCamp app.
5\. Select the product which you want on the roadmap.
6\. Once posted, you'll see it in your Intercom Messenger.
Well done! 🙌
Happy to get your feedback.
# Zapier
Integrating ProdCamp with Zapier
{% hint style="info" %}
### Zapier integration works using our public API. Check [pricing](https://www.prodcamp.com/pricing) if it's available in your subscription.
{% endhint %}
### Step 1. Connect ProdCamp to Zapier
1. Log in to your [Zapier account](https://zapier.com/app/login) or create a new account.
2. Follow [**this link**](https://zapier.com/developer/public-invite/199626/78dc0e4405a224b32c300ce16bfdffa8/) to be invited to test the connector while Zapier tests it and makes it public.
3. Click on "Apps" from the left menu.
4. In the Search field for apps type "ProdCamp" and click Connect.
5. On the page, provide your API key and product ID by following the links on the page.
6. Need help? Let us know in chat.
### Step 2. Configure integration scenarios
### Triggers in ProdCamp
* New feedback is created
### Actions
* Create feedback
* Create feature
Need other actions or triggers? Let us know in chat.
### Examples
* When new feedback is created in ProdCamp, send a notification to Microsoft Teams.
* When new feedback is created in ProdCamp, send a message to Telegram
* When a tag is added to an Intercom message, create Feedback in ProdCamp
* When a tag is added to an Intercom message, create a Feature in ProdCamp
Need additional actions or triggers? [Let us know.](mailto:hello@prodcamp.com)
# Import Features
## Import from CSV
### Prepare a CSV file
To import features from a CSV file, first, you need to prepare such a file.
Go to the "**Import**" section by pressing the according button in the main menu.
On the "**Import Features (CSV)**" tab you will see the "**Instructions**" section where you can read about what are the requirements for the file that will be imported.
### Perform the import
#### Upload a file
On the same page press the "**Select File**" button and choose a file from your file system.

Then press the "Upload" button and the file you've chosen will be uploaded to the server. \
After this, you will see a table with headers from your file so you can verify that it corresponds to the first row.
#### Map headers to feature fields
Now you have to manually map each available feature field to a header in your file so data can be set correctly during the import process.

Press the "**Start Import**" button to start the import
You will be able to see the import process status at the top of the page. After the import process finishes, there will be the latest import stats displayed.
# Import Customers
## Import from CSV
### Prepare a CSV file
To import customers from a CSV file, first, you need to prepare such a file.
Go to the "**Import**" section by pressing the according button in the main menu.
On the "**Import Customers (CSV)**" tab you will see the "**Instructions**" section where you can read about what are the requirements for the file that will be imported.
### Perform the import
#### Upload a file
On the same page press the "**Select File**" button and choose a file from your file system.

Then press the "Upload" button and the file you've chosen will be uploaded to the server. \
After this, you will see a table with headers from your file so you can verify that it corresponds to the first row.
#### Map headers to fields from customer accounts and contact entities
Now you have to manually map the available account and contact fields to headers in your file so data can be set correctly during the import process. (all fields are optional, but we recommend mapping at least "Annual Revenue", "Account Name" and "Contact Email" fields)

Press the "**Start Import**" button to start the import process.
You will be able to see the import process status at the top of this tab. \
After the import process finishes, there will be the latest import stats displayed.
🙌
# Profile
Page where users can manage their profile information
On this page, a user can change his First Name, Last Name or set his avatar

## Change profile avatar
To change your profile avatar go to the "Profile" page and click on the "change your profile avatar" link near the avatar image box
In the appeared window press the "Choose File" button and choose a file from your file system

Then press "Save" and your avatar will be updated
# Contact Us
If this resource is covering everything you would like to know, don't hesitate and let us know.
Email us: `support@prodcamp.com`
Chat with us: use the chat that you find on the website or inside the app
Want to leave feedback about the app? In the app, you will find the Feedback button.
Let's be in touch! 📬
# Authentication
## Using ProdCamp API
To start using our API you need just a couple of things: generate an API key and get your product ID to make requests to the right product in your workspace.
### 1. Generate an API key
To do that you need to go to the "**Workspace Settings**" page and then to the "**API**" tab inside your account and press the "**Generate**" button.


### 2. Determine the Product ID
To get your product ID you can go to the "**Products**" page and see it in the "**ID**" column of the products list.

Now, when you have your product ID and your API key you can make requests to the ProdCamp API endpoint.
### Using the product ID
Product ID must be set into the "**X-ProductId"** request header. If no product ID header is sent to the API - the request will be executed as if it was sent with a product ID of your first product in the list.
### Using the API key
The API key can be sent either as a query parameter "**apikey**", or a request header "**X-apikey"**
**Example** of using the API key as a query parameter:
```
https://app.prodcamp.com/api/v1/feedbacks?apikey=xxxxxxxx-xxxx-xxxx-xxxx-xxxxxxxxxxxx
```
# Feedback API
## Using the feedback API
API Description can be found in our Swagger docs here:
{% openapi src="/files/VstEIIJKYFm1HA75lpPf" path="/api/v1/feedback" method="get" %}
[ProdCamp-prodcamp\_app-v1.0-resolved.json](https://3223839397-files.gitbook.io/~/files/v0/b/gitbook-x-prod.appspot.com/o/spaces%2F-M9YH1onkNo4yiuWdB4j%2Fuploads%2Fz3gzqbCEmkXDhvz1WwXE%2FProdCamp-prodcamp_app-v1.0-resolved.json?alt=media\&token=9ccff89b-c25b-4b20-91b7-dea377b18a19)
{% endopenapi %}
{% openapi src="/files/VstEIIJKYFm1HA75lpPf" path="/api/v1/feedback" method="post" %}
[ProdCamp-prodcamp\_app-v1.0-resolved.json](https://3223839397-files.gitbook.io/~/files/v0/b/gitbook-x-prod.appspot.com/o/spaces%2F-M9YH1onkNo4yiuWdB4j%2Fuploads%2Fz3gzqbCEmkXDhvz1WwXE%2FProdCamp-prodcamp_app-v1.0-resolved.json?alt=media\&token=9ccff89b-c25b-4b20-91b7-dea377b18a19)
{% endopenapi %}
{% openapi src="/files/VstEIIJKYFm1HA75lpPf" path="/api/v1/feedback/{id}" method="get" %}
[ProdCamp-prodcamp\_app-v1.0-resolved.json](https://3223839397-files.gitbook.io/~/files/v0/b/gitbook-x-prod.appspot.com/o/spaces%2F-M9YH1onkNo4yiuWdB4j%2Fuploads%2Fz3gzqbCEmkXDhvz1WwXE%2FProdCamp-prodcamp_app-v1.0-resolved.json?alt=media\&token=9ccff89b-c25b-4b20-91b7-dea377b18a19)
{% endopenapi %}
{% openapi src="/files/VstEIIJKYFm1HA75lpPf" path="/api/v1/feedback/{id}" method="put" %}
[ProdCamp-prodcamp\_app-v1.0-resolved.json](https://3223839397-files.gitbook.io/~/files/v0/b/gitbook-x-prod.appspot.com/o/spaces%2F-M9YH1onkNo4yiuWdB4j%2Fuploads%2Fz3gzqbCEmkXDhvz1WwXE%2FProdCamp-prodcamp_app-v1.0-resolved.json?alt=media\&token=9ccff89b-c25b-4b20-91b7-dea377b18a19)
{% endopenapi %}
{% openapi src="/files/VstEIIJKYFm1HA75lpPf" path="/api/v1/feedback/{id}" method="delete" %}
[ProdCamp-prodcamp\_app-v1.0-resolved.json](https://3223839397-files.gitbook.io/~/files/v0/b/gitbook-x-prod.appspot.com/o/spaces%2F-M9YH1onkNo4yiuWdB4j%2Fuploads%2Fz3gzqbCEmkXDhvz1WwXE%2FProdCamp-prodcamp_app-v1.0-resolved.json?alt=media\&token=9ccff89b-c25b-4b20-91b7-dea377b18a19)
{% endopenapi %}
{% openapi src="/files/VstEIIJKYFm1HA75lpPf" path="/api/v1/feedback/batch/delete" method="put" %}
[ProdCamp-prodcamp\_app-v1.0-resolved.json](https://3223839397-files.gitbook.io/~/files/v0/b/gitbook-x-prod.appspot.com/o/spaces%2F-M9YH1onkNo4yiuWdB4j%2Fuploads%2Fz3gzqbCEmkXDhvz1WwXE%2FProdCamp-prodcamp_app-v1.0-resolved.json?alt=media\&token=9ccff89b-c25b-4b20-91b7-dea377b18a19)
{% endopenapi %}
{% openapi src="/files/VstEIIJKYFm1HA75lpPf" path="/api/v1/feedback/batch/update" method="post" %}
[ProdCamp-prodcamp\_app-v1.0-resolved.json](https://3223839397-files.gitbook.io/~/files/v0/b/gitbook-x-prod.appspot.com/o/spaces%2F-M9YH1onkNo4yiuWdB4j%2Fuploads%2Fz3gzqbCEmkXDhvz1WwXE%2FProdCamp-prodcamp_app-v1.0-resolved.json?alt=media\&token=9ccff89b-c25b-4b20-91b7-dea377b18a19)
{% endopenapi %}
{% openapi src="/files/VstEIIJKYFm1HA75lpPf" path="/api/v1/feedback/states" method="get" %}
[ProdCamp-prodcamp\_app-v1.0-resolved.json](https://3223839397-files.gitbook.io/~/files/v0/b/gitbook-x-prod.appspot.com/o/spaces%2F-M9YH1onkNo4yiuWdB4j%2Fuploads%2Fz3gzqbCEmkXDhvz1WwXE%2FProdCamp-prodcamp_app-v1.0-resolved.json?alt=media\&token=9ccff89b-c25b-4b20-91b7-dea377b18a19)
{% endopenapi %}
{% openapi src="/files/VstEIIJKYFm1HA75lpPf" path="/api/v1/feedback/{feedbackId}/state" method="post" %}
[ProdCamp-prodcamp\_app-v1.0-resolved.json](https://3223839397-files.gitbook.io/~/files/v0/b/gitbook-x-prod.appspot.com/o/spaces%2F-M9YH1onkNo4yiuWdB4j%2Fuploads%2Fz3gzqbCEmkXDhvz1WwXE%2FProdCamp-prodcamp_app-v1.0-resolved.json?alt=media\&token=9ccff89b-c25b-4b20-91b7-dea377b18a19)
{% endopenapi %}
{% openapi src="/files/VstEIIJKYFm1HA75lpPf" path="/api/v1/feedback/{feedbackId}/features" method="put" %}
[ProdCamp-prodcamp\_app-v1.0-resolved.json](https://3223839397-files.gitbook.io/~/files/v0/b/gitbook-x-prod.appspot.com/o/spaces%2F-M9YH1onkNo4yiuWdB4j%2Fuploads%2Fz3gzqbCEmkXDhvz1WwXE%2FProdCamp-prodcamp_app-v1.0-resolved.json?alt=media\&token=9ccff89b-c25b-4b20-91b7-dea377b18a19)
{% endopenapi %}
{% openapi src="/files/VstEIIJKYFm1HA75lpPf" path="/api/v1/feedback/{feedbackId}/comments" method="get" %}
[ProdCamp-prodcamp\_app-v1.0-resolved.json](https://3223839397-files.gitbook.io/~/files/v0/b/gitbook-x-prod.appspot.com/o/spaces%2F-M9YH1onkNo4yiuWdB4j%2Fuploads%2Fz3gzqbCEmkXDhvz1WwXE%2FProdCamp-prodcamp_app-v1.0-resolved.json?alt=media\&token=9ccff89b-c25b-4b20-91b7-dea377b18a19)
{% endopenapi %}
{% openapi src="/files/VstEIIJKYFm1HA75lpPf" path="/api/v1/feedback/{feedbackId}/comments" method="post" %}
[ProdCamp-prodcamp\_app-v1.0-resolved.json](https://3223839397-files.gitbook.io/~/files/v0/b/gitbook-x-prod.appspot.com/o/spaces%2F-M9YH1onkNo4yiuWdB4j%2Fuploads%2Fz3gzqbCEmkXDhvz1WwXE%2FProdCamp-prodcamp_app-v1.0-resolved.json?alt=media\&token=9ccff89b-c25b-4b20-91b7-dea377b18a19)
{% endopenapi %}
{% openapi src="/files/VstEIIJKYFm1HA75lpPf" path="/api/v1/feedback/comments/{commentId}" method="put" %}
[ProdCamp-prodcamp\_app-v1.0-resolved.json](https://3223839397-files.gitbook.io/~/files/v0/b/gitbook-x-prod.appspot.com/o/spaces%2F-M9YH1onkNo4yiuWdB4j%2Fuploads%2Fz3gzqbCEmkXDhvz1WwXE%2FProdCamp-prodcamp_app-v1.0-resolved.json?alt=media\&token=9ccff89b-c25b-4b20-91b7-dea377b18a19)
{% endopenapi %}
{% openapi src="/files/VstEIIJKYFm1HA75lpPf" path="/api/v1/feedback/comments/{commentId}" method="delete" %}
[ProdCamp-prodcamp\_app-v1.0-resolved.json](https://3223839397-files.gitbook.io/~/files/v0/b/gitbook-x-prod.appspot.com/o/spaces%2F-M9YH1onkNo4yiuWdB4j%2Fuploads%2Fz3gzqbCEmkXDhvz1WwXE%2FProdCamp-prodcamp_app-v1.0-resolved.json?alt=media\&token=9ccff89b-c25b-4b20-91b7-dea377b18a19)
{% endopenapi %}
## Some models explained
[Feedback type](/api/feedback/feedback-types)
[Feedback state](/api/feedback/feedback-states)
# Feedback Types
#### Feedback type model
```
{
id: 4,
caption: "Customer Interview"
}
```
#### Feedback types enum (each numeric value can be used as a type ID in requests)
```
SurveyFeedback = 1,
Widget = 2,
NPS = 3,
CustomerInterview = 4,
VoteFeedback = 5,
FeatureProposal = 6,
External = 7,
Email = 8
```
# Feedback States
#### Feedback state model
```
{
id: 1,
caption: "Unprocessed"
}
```
#### Feedback states enum (each numeric value can be used as a type ID in requests)
```
Unprocessed = 1,
Processed = 2
```
# Features API
This page describes how to work with Features using REST API
### Using the Features API
API Description can be found in our Swagger docs here:
{% openapi src="/files/VstEIIJKYFm1HA75lpPf" path="/api/v1/features" method="get" %}
[ProdCamp-prodcamp\_app-v1.0-resolved.json](https://3223839397-files.gitbook.io/~/files/v0/b/gitbook-x-prod.appspot.com/o/spaces%2F-M9YH1onkNo4yiuWdB4j%2Fuploads%2Fz3gzqbCEmkXDhvz1WwXE%2FProdCamp-prodcamp_app-v1.0-resolved.json?alt=media\&token=9ccff89b-c25b-4b20-91b7-dea377b18a19)
{% endopenapi %}
{% openapi src="/files/VstEIIJKYFm1HA75lpPf" path="/api/v1/features" method="post" %}
[ProdCamp-prodcamp\_app-v1.0-resolved.json](https://3223839397-files.gitbook.io/~/files/v0/b/gitbook-x-prod.appspot.com/o/spaces%2F-M9YH1onkNo4yiuWdB4j%2Fuploads%2Fz3gzqbCEmkXDhvz1WwXE%2FProdCamp-prodcamp_app-v1.0-resolved.json?alt=media\&token=9ccff89b-c25b-4b20-91b7-dea377b18a19)
{% endopenapi %}
{% openapi src="/files/VstEIIJKYFm1HA75lpPf" path="/api/v1/features/advanced" method="get" %}
[ProdCamp-prodcamp\_app-v1.0-resolved.json](https://3223839397-files.gitbook.io/~/files/v0/b/gitbook-x-prod.appspot.com/o/spaces%2F-M9YH1onkNo4yiuWdB4j%2Fuploads%2Fz3gzqbCEmkXDhvz1WwXE%2FProdCamp-prodcamp_app-v1.0-resolved.json?alt=media\&token=9ccff89b-c25b-4b20-91b7-dea377b18a19)
{% endopenapi %}
{% openapi src="/files/VstEIIJKYFm1HA75lpPf" path="/api/v1/features/refs" method="get" %}
[ProdCamp-prodcamp\_app-v1.0-resolved.json](https://3223839397-files.gitbook.io/~/files/v0/b/gitbook-x-prod.appspot.com/o/spaces%2F-M9YH1onkNo4yiuWdB4j%2Fuploads%2Fz3gzqbCEmkXDhvz1WwXE%2FProdCamp-prodcamp_app-v1.0-resolved.json?alt=media\&token=9ccff89b-c25b-4b20-91b7-dea377b18a19)
{% endopenapi %}
{% openapi src="/files/VstEIIJKYFm1HA75lpPf" path="/api/v1/features/{index}" method="get" %}
[ProdCamp-prodcamp\_app-v1.0-resolved.json](https://3223839397-files.gitbook.io/~/files/v0/b/gitbook-x-prod.appspot.com/o/spaces%2F-M9YH1onkNo4yiuWdB4j%2Fuploads%2Fz3gzqbCEmkXDhvz1WwXE%2FProdCamp-prodcamp_app-v1.0-resolved.json?alt=media\&token=9ccff89b-c25b-4b20-91b7-dea377b18a19)
{% endopenapi %}
{% openapi src="/files/VstEIIJKYFm1HA75lpPf" path="/api/v1/features/{index}" method="put" %}
[ProdCamp-prodcamp\_app-v1.0-resolved.json](https://3223839397-files.gitbook.io/~/files/v0/b/gitbook-x-prod.appspot.com/o/spaces%2F-M9YH1onkNo4yiuWdB4j%2Fuploads%2Fz3gzqbCEmkXDhvz1WwXE%2FProdCamp-prodcamp_app-v1.0-resolved.json?alt=media\&token=9ccff89b-c25b-4b20-91b7-dea377b18a19)
{% endopenapi %}
{% openapi src="/files/VstEIIJKYFm1HA75lpPf" path="/api/v1/features/{index}" method="delete" %}
[ProdCamp-prodcamp\_app-v1.0-resolved.json](https://3223839397-files.gitbook.io/~/files/v0/b/gitbook-x-prod.appspot.com/o/spaces%2F-M9YH1onkNo4yiuWdB4j%2Fuploads%2Fz3gzqbCEmkXDhvz1WwXE%2FProdCamp-prodcamp_app-v1.0-resolved.json?alt=media\&token=9ccff89b-c25b-4b20-91b7-dea377b18a19)
{% endopenapi %}
{% openapi src="/files/VstEIIJKYFm1HA75lpPf" path="/api/v1/features/{index}/comments" method="get" %}
[ProdCamp-prodcamp\_app-v1.0-resolved.json](https://3223839397-files.gitbook.io/~/files/v0/b/gitbook-x-prod.appspot.com/o/spaces%2F-M9YH1onkNo4yiuWdB4j%2Fuploads%2Fz3gzqbCEmkXDhvz1WwXE%2FProdCamp-prodcamp_app-v1.0-resolved.json?alt=media\&token=9ccff89b-c25b-4b20-91b7-dea377b18a19)
{% endopenapi %}
{% openapi src="/files/VstEIIJKYFm1HA75lpPf" path="/api/v1/features/{index}/comments" method="post" %}
[ProdCamp-prodcamp\_app-v1.0-resolved.json](https://3223839397-files.gitbook.io/~/files/v0/b/gitbook-x-prod.appspot.com/o/spaces%2F-M9YH1onkNo4yiuWdB4j%2Fuploads%2Fz3gzqbCEmkXDhvz1WwXE%2FProdCamp-prodcamp_app-v1.0-resolved.json?alt=media\&token=9ccff89b-c25b-4b20-91b7-dea377b18a19)
{% endopenapi %}
{% openapi src="/files/VstEIIJKYFm1HA75lpPf" path="/api/v1/features/{index}/comments/{commentId}/public" method="put" %}
[ProdCamp-prodcamp\_app-v1.0-resolved.json](https://3223839397-files.gitbook.io/~/files/v0/b/gitbook-x-prod.appspot.com/o/spaces%2F-M9YH1onkNo4yiuWdB4j%2Fuploads%2Fz3gzqbCEmkXDhvz1WwXE%2FProdCamp-prodcamp_app-v1.0-resolved.json?alt=media\&token=9ccff89b-c25b-4b20-91b7-dea377b18a19)
{% endopenapi %}
{% openapi src="/files/VstEIIJKYFm1HA75lpPf" path="/api/v1/features/{index}/comments/{commentId}" method="delete" %}
[ProdCamp-prodcamp\_app-v1.0-resolved.json](https://3223839397-files.gitbook.io/~/files/v0/b/gitbook-x-prod.appspot.com/o/spaces%2F-M9YH1onkNo4yiuWdB4j%2Fuploads%2Fz3gzqbCEmkXDhvz1WwXE%2FProdCamp-prodcamp_app-v1.0-resolved.json?alt=media\&token=9ccff89b-c25b-4b20-91b7-dea377b18a19)
{% endopenapi %}
{% openapi src="/files/VstEIIJKYFm1HA75lpPf" path="/api/v1/features/batch/update" method="put" %}
[ProdCamp-prodcamp\_app-v1.0-resolved.json](https://3223839397-files.gitbook.io/~/files/v0/b/gitbook-x-prod.appspot.com/o/spaces%2F-M9YH1onkNo4yiuWdB4j%2Fuploads%2Fz3gzqbCEmkXDhvz1WwXE%2FProdCamp-prodcamp_app-v1.0-resolved.json?alt=media\&token=9ccff89b-c25b-4b20-91b7-dea377b18a19)
{% endopenapi %}
{% openapi src="/files/VstEIIJKYFm1HA75lpPf" path="/api/v1/features/batch/delete" method="put" %}
[ProdCamp-prodcamp\_app-v1.0-resolved.json](https://3223839397-files.gitbook.io/~/files/v0/b/gitbook-x-prod.appspot.com/o/spaces%2F-M9YH1onkNo4yiuWdB4j%2Fuploads%2Fz3gzqbCEmkXDhvz1WwXE%2FProdCamp-prodcamp_app-v1.0-resolved.json?alt=media\&token=9ccff89b-c25b-4b20-91b7-dea377b18a19)
{% endopenapi %}
{% openapi src="/files/VstEIIJKYFm1HA75lpPf" path="/api/v1/features/priorities" method="get" %}
[ProdCamp-prodcamp\_app-v1.0-resolved.json](https://3223839397-files.gitbook.io/~/files/v0/b/gitbook-x-prod.appspot.com/o/spaces%2F-M9YH1onkNo4yiuWdB4j%2Fuploads%2Fz3gzqbCEmkXDhvz1WwXE%2FProdCamp-prodcamp_app-v1.0-resolved.json?alt=media\&token=9ccff89b-c25b-4b20-91b7-dea377b18a19)
{% endopenapi %}
{% openapi src="/files/VstEIIJKYFm1HA75lpPf" path="/api/v1/features/statuses" method="get" %}
[ProdCamp-prodcamp\_app-v1.0-resolved.json](https://3223839397-files.gitbook.io/~/files/v0/b/gitbook-x-prod.appspot.com/o/spaces%2F-M9YH1onkNo4yiuWdB4j%2Fuploads%2Fz3gzqbCEmkXDhvz1WwXE%2FProdCamp-prodcamp_app-v1.0-resolved.json?alt=media\&token=9ccff89b-c25b-4b20-91b7-dea377b18a19)
{% endopenapi %}
{% openapi src="/files/VstEIIJKYFm1HA75lpPf" path="/api/v1/features/types" method="get" %}
[ProdCamp-prodcamp\_app-v1.0-resolved.json](https://3223839397-files.gitbook.io/~/files/v0/b/gitbook-x-prod.appspot.com/o/spaces%2F-M9YH1onkNo4yiuWdB4j%2Fuploads%2Fz3gzqbCEmkXDhvz1WwXE%2FProdCamp-prodcamp_app-v1.0-resolved.json?alt=media\&token=9ccff89b-c25b-4b20-91b7-dea377b18a19)
{% endopenapi %}
# Customers API
## Using the Customers API
API Description can be found in our Swagger docs here:
{% openapi src="/files/UFWzlmincAmdCs4Cekpm" path="/api/v1/Customers/accounts" method="get" %}
[ProdCamp-prodcamp\_app-v1.0-resolved.json](https://3223839397-files.gitbook.io/~/files/v0/b/gitbook-x-prod.appspot.com/o/spaces%2F-M9YH1onkNo4yiuWdB4j%2Fuploads%2FgiYUlAbZg2fl2gR7JvPe%2FProdCamp-prodcamp_app-v1.0-resolved.json?alt=media\&token=e3d28e5f-5b3d-497c-af55-40aae5b78a13)
{% endopenapi %}
{% openapi src="/files/UFWzlmincAmdCs4Cekpm" path="/api/v1/Customers/accounts" method="post" %}
[ProdCamp-prodcamp\_app-v1.0-resolved.json](https://3223839397-files.gitbook.io/~/files/v0/b/gitbook-x-prod.appspot.com/o/spaces%2F-M9YH1onkNo4yiuWdB4j%2Fuploads%2FgiYUlAbZg2fl2gR7JvPe%2FProdCamp-prodcamp_app-v1.0-resolved.json?alt=media\&token=e3d28e5f-5b3d-497c-af55-40aae5b78a13)
{% endopenapi %}
{% openapi src="/files/UFWzlmincAmdCs4Cekpm" path="/api/v1/Customers/accounts/{id}" method="get" %}
[ProdCamp-prodcamp\_app-v1.0-resolved.json](https://3223839397-files.gitbook.io/~/files/v0/b/gitbook-x-prod.appspot.com/o/spaces%2F-M9YH1onkNo4yiuWdB4j%2Fuploads%2FgiYUlAbZg2fl2gR7JvPe%2FProdCamp-prodcamp_app-v1.0-resolved.json?alt=media\&token=e3d28e5f-5b3d-497c-af55-40aae5b78a13)
{% endopenapi %}
{% openapi src="/files/UFWzlmincAmdCs4Cekpm" path="/api/v1/Customers/accounts/{id}" method="put" %}
[ProdCamp-prodcamp\_app-v1.0-resolved.json](https://3223839397-files.gitbook.io/~/files/v0/b/gitbook-x-prod.appspot.com/o/spaces%2F-M9YH1onkNo4yiuWdB4j%2Fuploads%2FgiYUlAbZg2fl2gR7JvPe%2FProdCamp-prodcamp_app-v1.0-resolved.json?alt=media\&token=e3d28e5f-5b3d-497c-af55-40aae5b78a13)
{% endopenapi %}
{% openapi src="/files/UFWzlmincAmdCs4Cekpm" path="/api/v1/Customers/accounts/{id}" method="delete" %}
[ProdCamp-prodcamp\_app-v1.0-resolved.json](https://3223839397-files.gitbook.io/~/files/v0/b/gitbook-x-prod.appspot.com/o/spaces%2F-M9YH1onkNo4yiuWdB4j%2Fuploads%2FgiYUlAbZg2fl2gR7JvPe%2FProdCamp-prodcamp_app-v1.0-resolved.json?alt=media\&token=e3d28e5f-5b3d-497c-af55-40aae5b78a13)
{% endopenapi %}
{% openapi src="/files/UFWzlmincAmdCs4Cekpm" path="/api/v1/Customers/contacts" method="get" %}
[ProdCamp-prodcamp\_app-v1.0-resolved.json](https://3223839397-files.gitbook.io/~/files/v0/b/gitbook-x-prod.appspot.com/o/spaces%2F-M9YH1onkNo4yiuWdB4j%2Fuploads%2FgiYUlAbZg2fl2gR7JvPe%2FProdCamp-prodcamp_app-v1.0-resolved.json?alt=media\&token=e3d28e5f-5b3d-497c-af55-40aae5b78a13)
{% endopenapi %}
{% openapi src="/files/UFWzlmincAmdCs4Cekpm" path="/api/v1/Customers/contacts" method="post" %}
[ProdCamp-prodcamp\_app-v1.0-resolved.json](https://3223839397-files.gitbook.io/~/files/v0/b/gitbook-x-prod.appspot.com/o/spaces%2F-M9YH1onkNo4yiuWdB4j%2Fuploads%2FgiYUlAbZg2fl2gR7JvPe%2FProdCamp-prodcamp_app-v1.0-resolved.json?alt=media\&token=e3d28e5f-5b3d-497c-af55-40aae5b78a13)
{% endopenapi %}
{% openapi src="/files/UFWzlmincAmdCs4Cekpm" path="/api/v1/Customers/contacts/{id}" method="get" %}
[ProdCamp-prodcamp\_app-v1.0-resolved.json](https://3223839397-files.gitbook.io/~/files/v0/b/gitbook-x-prod.appspot.com/o/spaces%2F-M9YH1onkNo4yiuWdB4j%2Fuploads%2FgiYUlAbZg2fl2gR7JvPe%2FProdCamp-prodcamp_app-v1.0-resolved.json?alt=media\&token=e3d28e5f-5b3d-497c-af55-40aae5b78a13)
{% endopenapi %}
{% openapi src="/files/UFWzlmincAmdCs4Cekpm" path="/api/v1/Customers/contacts/{id}" method="put" %}
[ProdCamp-prodcamp\_app-v1.0-resolved.json](https://3223839397-files.gitbook.io/~/files/v0/b/gitbook-x-prod.appspot.com/o/spaces%2F-M9YH1onkNo4yiuWdB4j%2Fuploads%2FgiYUlAbZg2fl2gR7JvPe%2FProdCamp-prodcamp_app-v1.0-resolved.json?alt=media\&token=e3d28e5f-5b3d-497c-af55-40aae5b78a13)
{% endopenapi %}
{% openapi src="/files/UFWzlmincAmdCs4Cekpm" path="/api/v1/Customers/contacts/{id}" method="delete" %}
[ProdCamp-prodcamp\_app-v1.0-resolved.json](https://3223839397-files.gitbook.io/~/files/v0/b/gitbook-x-prod.appspot.com/o/spaces%2F-M9YH1onkNo4yiuWdB4j%2Fuploads%2FgiYUlAbZg2fl2gR7JvPe%2FProdCamp-prodcamp_app-v1.0-resolved.json?alt=media\&token=e3d28e5f-5b3d-497c-af55-40aae5b78a13)
{% endopenapi %}
 button in the far left of your ProdCamp console.

Or on Add New Product directly inside your product section.

Once you name it you will see the Product details window with 3 subsections.

### Product Settings
Here is the place where you decide if you will make the features associated with this product available inside your public roadmap by turning on or off the public access and specifying your public roadmap subdomain.

If you decide to make this product available publicly you will need to give your public roadmap
a description and a title, upload your product logo, favicon, and internal avatar to align with your brand, and implement redirect links leading to your main website or application.
Ultimately you will also have the ability to select what would be the default display of your Public Roadmap between your Backlog, Planned, and released feature.

### Setup Themes
ProdCamp themes are the best way to organize your features into different categories and make sure that the features you're focusing on are aligned with your overall product strategy.

Since we know each organization has a different way of segmenting their work all themes names and colors are entirely customizable.
And you have the ability to create new ones using Create New Theme.

### Widget
ProdCamp gives you the ability to create an embeddable widget directly inside your application and allows your users to easily provide feedback.
Check our help article to [learn how to activate your embeddable widget](https://help.prodcamp.com/feedback-channels/embeddable-widget).

**If you feel this article doesn't answer your question please feel free to drop us an email at
button in the far left of your ProdCamp console.

Or on Add New Product directly inside your product section.

Once you name it you will see the Product details window with 3 subsections.

### Product Settings
Here is the place where you decide if you will make the features associated with this product available inside your public roadmap by turning on or off the public access and specifying your public roadmap subdomain.

If you decide to make this product available publicly you will need to give your public roadmap
a description and a title, upload your product logo, favicon, and internal avatar to align with your brand, and implement redirect links leading to your main website or application.
Ultimately you will also have the ability to select what would be the default display of your Public Roadmap between your Backlog, Planned, and released feature.

### Setup Themes
ProdCamp themes are the best way to organize your features into different categories and make sure that the features you're focusing on are aligned with your overall product strategy.

Since we know each organization has a different way of segmenting their work all themes names and colors are entirely customizable.
And you have the ability to create new ones using Create New Theme.

### Widget
ProdCamp gives you the ability to create an embeddable widget directly inside your application and allows your users to easily provide feedback.
Check our help article to [learn how to activate your embeddable widget](https://help.prodcamp.com/feedback-channels/embeddable-widget).

**If you feel this article doesn't answer your question please feel free to drop us an email at